Introduction to Spring with Pulsar
In this article we will discuss using the Java Framework, Spring, with Apache Pulsar. We will explain how to build Spring-based microservices in Java. For those who are not familiar with Spring, it is impressive as it is the leading Java framework and has been around for almost 20 years! Spring makes building Java applications easier by providing the wiring and control needed for building applications. It removes the repetitive boilerplate code that one would have to write. It allows developers to quickly build microservices as REST APIs, web applications, console applications, and more. I highly recommend checking out this impressive framework.
To get started building your first application, check out the Spring Starter Page, which gives the full source code for a custom running application that you just need to add your business logic to. You will find a number of resources for the Apache Pulsar Spring boot.
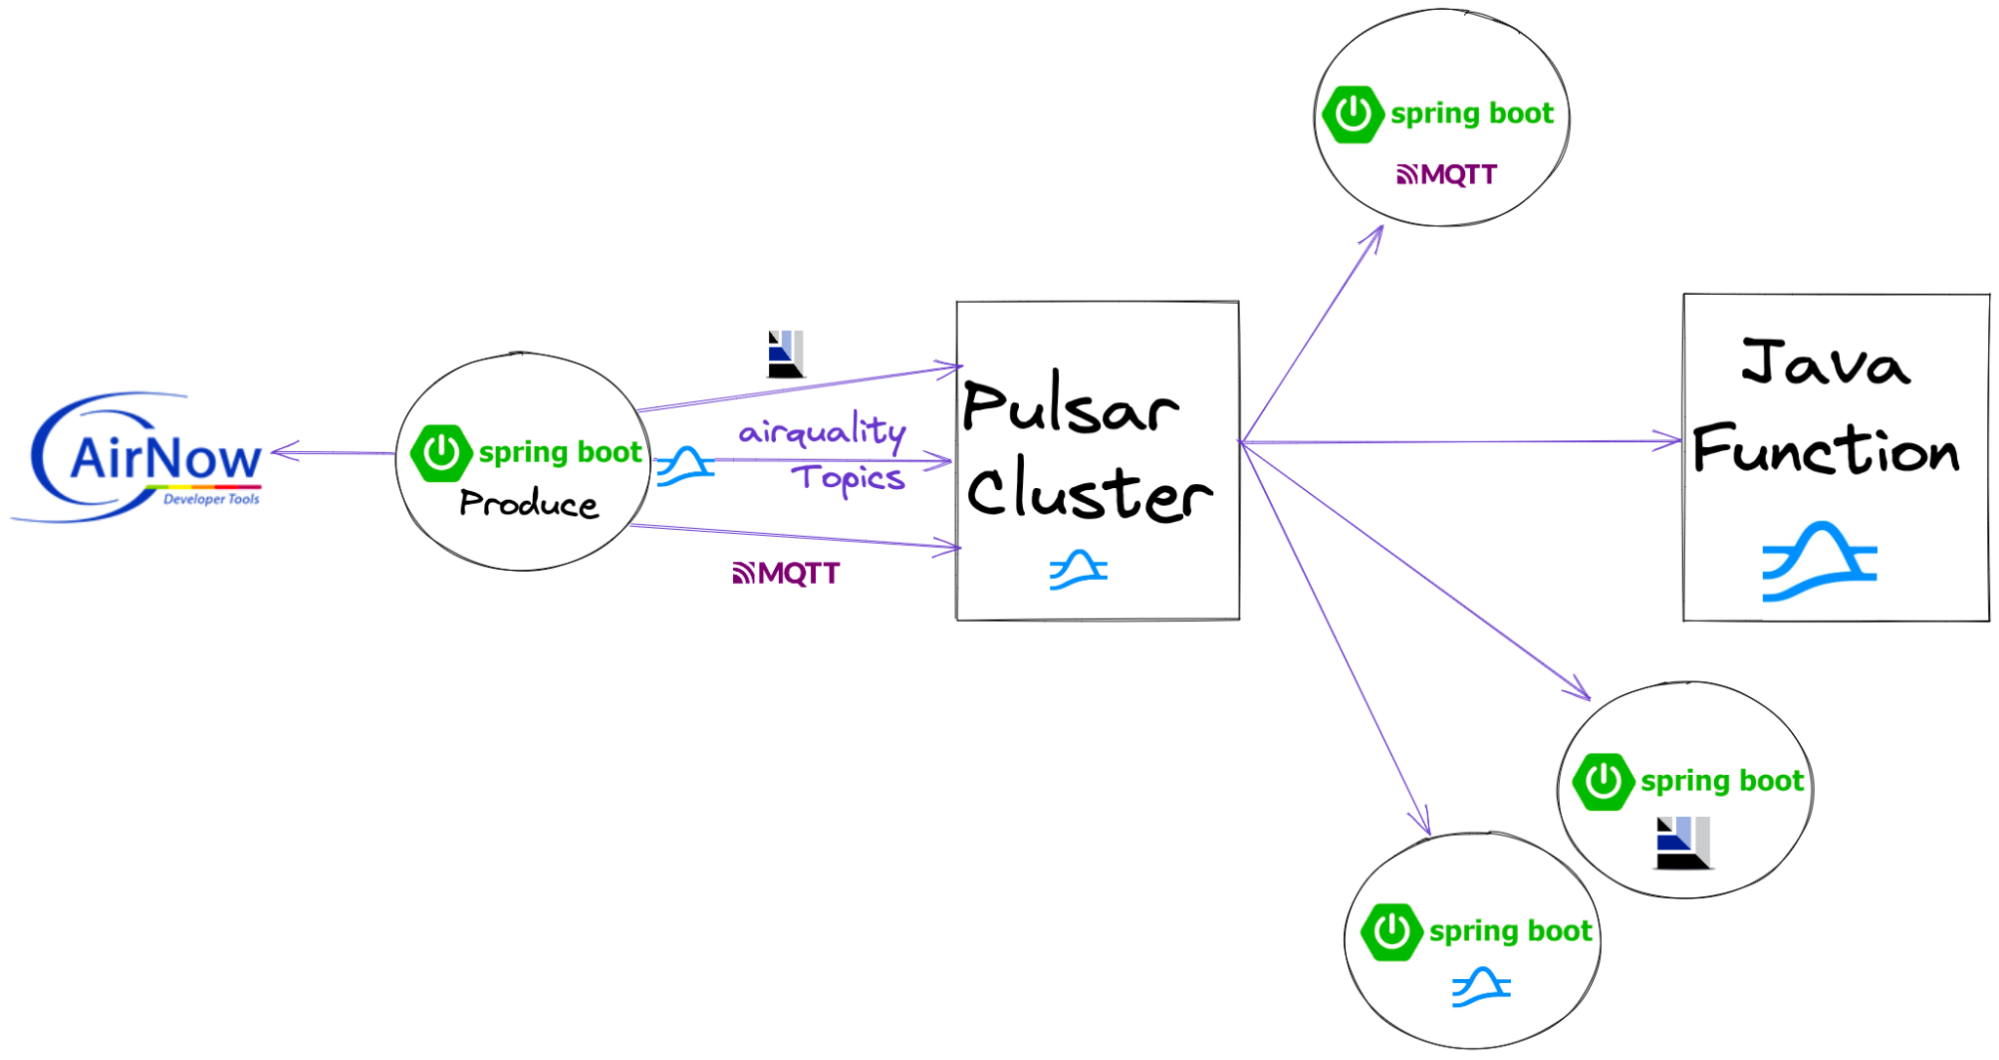
In my examples, I will build simple Spring Boot applications that use dependency injection to provide our application with instantiated and configured Apache Pulsar connections for producing and consuming messages. I will also show off the flexibility of Apache Pulsar to work with other messaging protocols by sending and receiving messages with AMQP, Kafka, and MQTT.
Finally, I want to mention there is also an advanced Reactive framework that is a great option for developers building Reactive Pulsar applications in Spring.
Building an Air-quality Application with Spring and Pulsar
Below is a diagram of the example application that I will build. As you can see Apache Pulsar is the lynchpin of this design. Pulsar acts as a router, gateway, messaging bus, and data distribution channel.
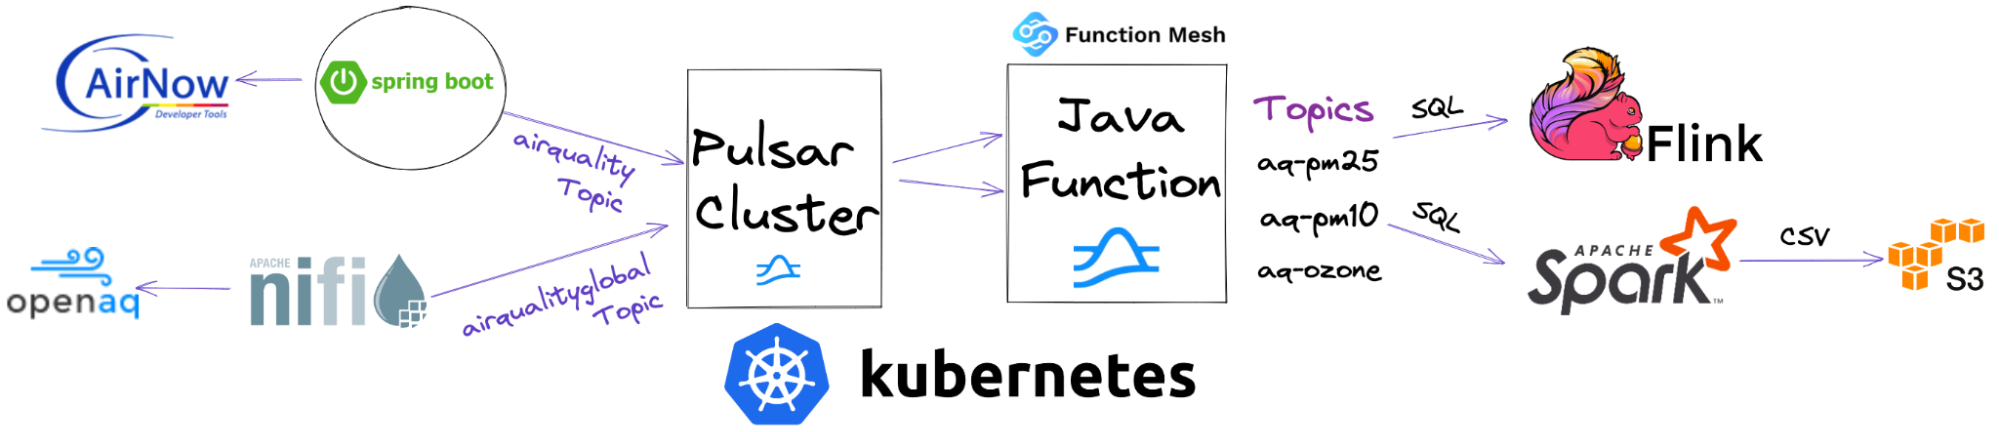 AirQuality Architecture from Ingest to Real-Time Analytics
One of the key reasons we use Apache Pulsar is for its ability to store and distribute messages at any scale to any number of clients and applications. This makes it easy to build on and use data without duplication, which is ideal for many purposes, such as ETL with Spark and Real-Time Continuous SQL Analytics with Flink. Pulsar also allows our Spring microservices to interoperate seamlessly with services written in other languages, such as Go, Python, C#, C++, Node.JS, and more.
AirQuality Architecture from Ingest to Real-Time Analytics
One of the key reasons we use Apache Pulsar is for its ability to store and distribute messages at any scale to any number of clients and applications. This makes it easy to build on and use data without duplication, which is ideal for many purposes, such as ETL with Spark and Real-Time Continuous SQL Analytics with Flink. Pulsar also allows our Spring microservices to interoperate seamlessly with services written in other languages, such as Go, Python, C#, C++, Node.JS, and more.
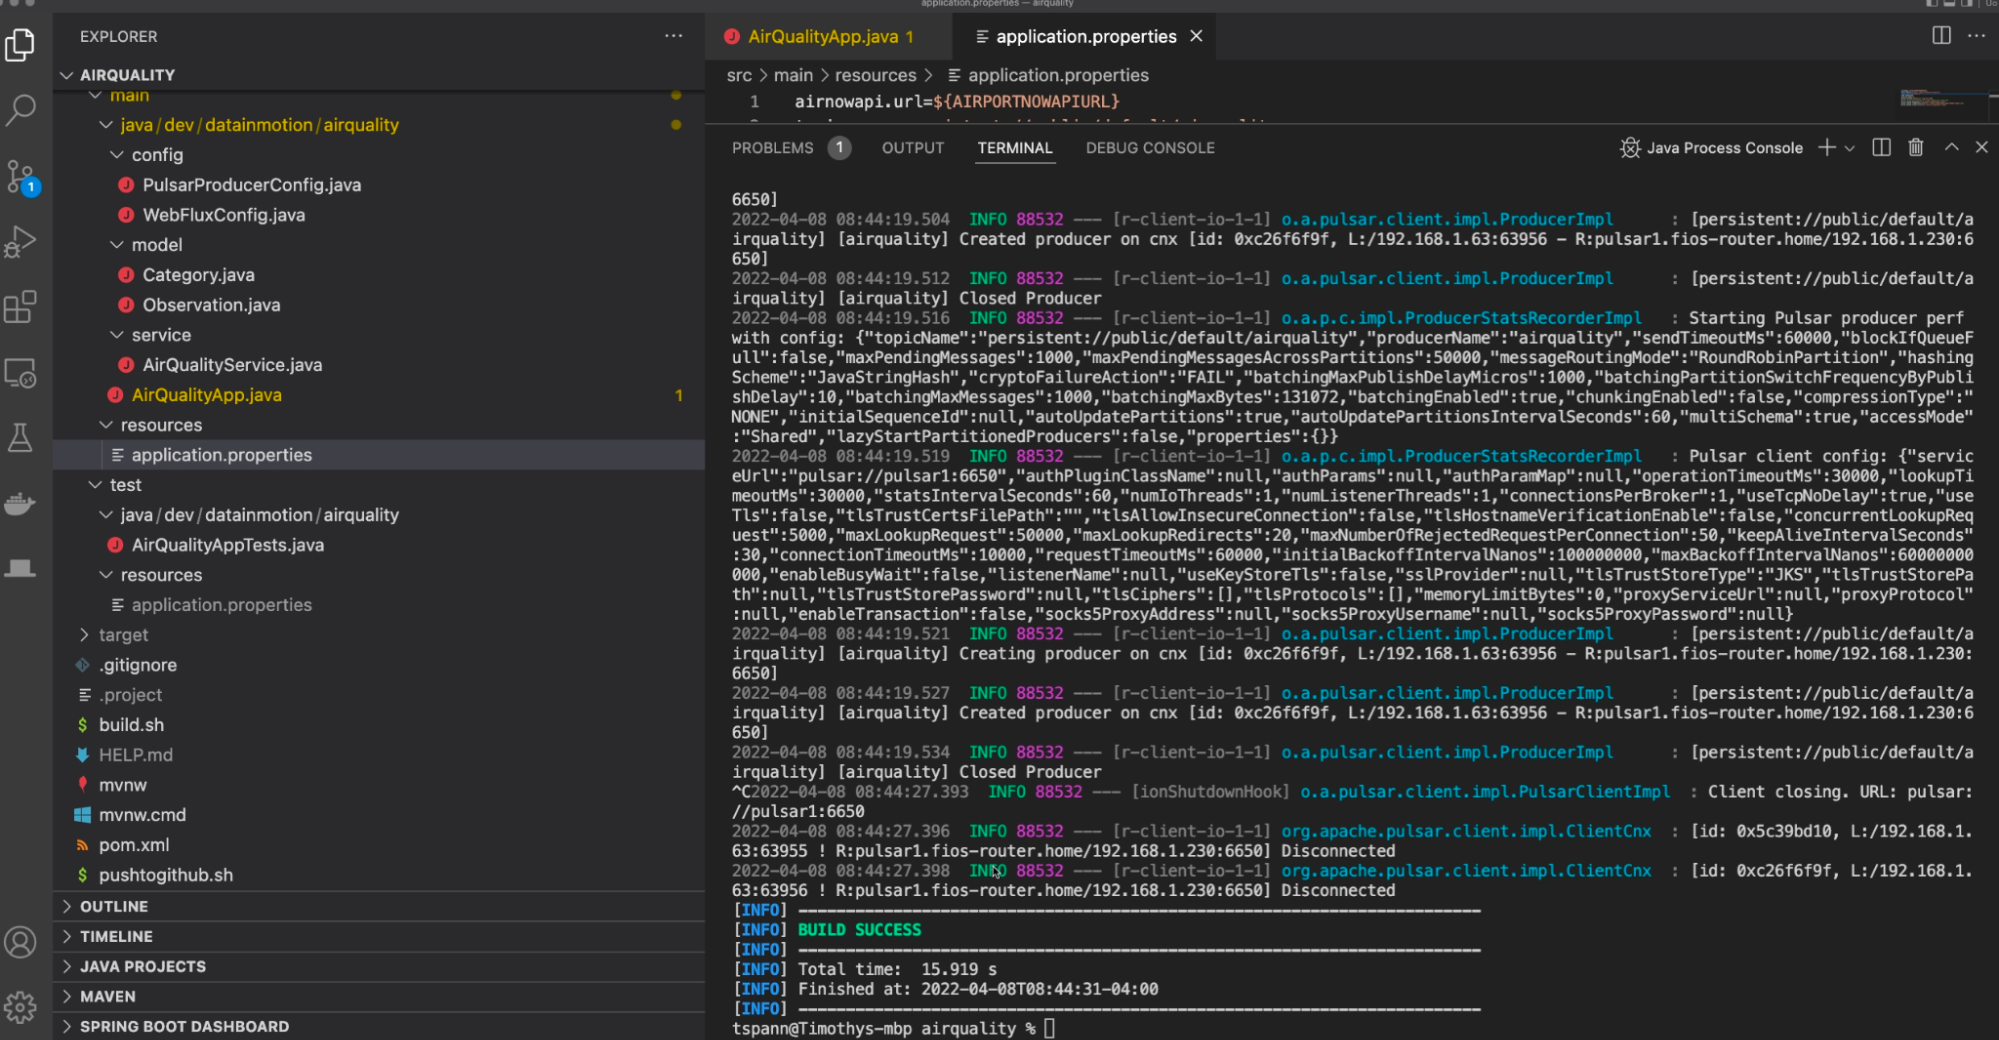
Here is the demo for my example application.
After building the empty application with Spring Boot starter, we need to add a few things to our maven build pom. You can also build with Gradle.
First, we set the version of Pulsar to build against. For this example, I chose Pulsar 2.10.0. I am also using JDK 1. At this point, we should not be using JDK 8 because JDK 17 will become the standard version soon.
       11
       2.10.0
Next, let’s add the Pulsar client dependencies.
        org.apache.pulsar
        pulsar-client
        ${pulsar.version}


        org.apache.pulsar
        pulsar-client-admin
        ${pulsar.version}


        org.apache.pulsar
        pulsar-client-original
        ${pulsar.version}
        pom
Now we can compile with the following:
To run the application, type:
mvn spring-boot:run
We need to populate our configuration file (application.resources) with the necessary values to connect to our cluster and ingest data. This file is typically in src/main/resources.
airnowapi.url=${AIRPORTNOWAPIURL}
topic.name=persistent://public/default/airquality
producer.name=airquality
send.timeout=60
security.mode=off
pulsar.service.url=pulsar://pulsar1:6650
#security.mode=on
#pulsar.service.url=pulsar+ssl://demo.sndemo.snio.cloud:6651
pulsar.oauth2.audience=urn:sn:pulsar:sndemo:demo-cluster
pulsar.oauth2.credentials-url=file:///cr/sndemo-tspann.json
pulsar.oauth2.issuer-url=https://auth.streamnative.cloud/
server.port=8999
#kafka
kafka.bootstrapAddress=pulsar1:9092
kafka.topic.name=airqualitykafka
#mqtt
mqtt.automaticReconnect=true
mqtt.cleanSession=true
mqtt.connectionTimeout=60
mqtt.clientId=airquality-MQTT
mqtt.hostname=pulsar1
mqtt.port=1883
mqtt.topic=airqualitymqtt
#amqp/rabbitmq
amqp.server=pulsar1:5672
amqp.topic=amqp-airquality
If you notice there is a security.mode and a pulsar.service.url that are commented out, these are so I can switch between my unsecured development environment and my production StreamNative hosted cloud version. We could automate this or use environment variables to make this more production quality. The airnowapi.url variable is set by the environment and includes a custom token to access Air Now REST feeds. You will need to sign up and get your own if you wish to use this data stream.
We can now start building our application. First, we will need to configure our connection to our Apache Pulsar cluster.
We create a Spring Configuration class that will instantiate a Pulsar client. We need a number of parameters using @Value tags to inject them from our application.properties file.
@Configuration
public class PulsarConfig {
    @Value("${pulsar.service.url}")
    String pulsarUrl;
    @Value("${security.mode:off}")
    String securityMode;
    @Value("${pulsar.oauth2.audience}")
    String audience;
    @Value("${pulsar.oauth2.credentials-url}")
    String credentialsUrl;
    @Value("${pulsar.oauth2.issuer-url}")
    String issuerUrl;

    @Bean
    public org.apache.pulsar.client.api.PulsarClient pulsarClient() {
        PulsarClient client = null;

        if (securityMode.equalsIgnoreCase(OFF)) {
            try {
                client = PulsarClient.builder().serviceUrl(pulsarUrl).build();
            } catch (PulsarClientException e) {
                e.printStackTrace();
                client = null;
            }
        } else {
            try {
                try {
                    client = PulsarClient.builder()
                            .serviceUrl(pulsarUrl)
                            .authentication(
                              AuthenticationFactoryOAuth2.clientCredentials(
                              new URL(issuerUrl),
                              new URL(credentialsUrl),audience)
                             ).build();
                } catch (MalformedURLException e) {
                    e.printStackTrace();
                }
            } catch (PulsarClientException e) {
                e.printStackTrace();
                client = null;
            }
        }
        return client;
    }
}
We can now configure a producer to use in our service.
@Configuration
public class PulsarProducerConfig {
    @Value("${producer.name:producername}")
    String producerName;

    @Value("${topic.name:airquality}")
    String topicName;

    @Autowired
    PulsarClient pulsarClient;

    @Bean
    public Producer  getProducer() {
        ProducerBuilder producerBuilder = pulsarClient.newProducer(JSONSchema.of(Observation.class))
           .topic(topicName)
           .producerName(producerName)
           .sendTimeout(60, TimeUnit.SECONDS);

        Producer producer = null;
        try {
            producer = producerBuilder.create();
        } catch (PulsarClientException e1) {
            e1.printStackTrace();
        }
        return producer;
    }
}
In the above configuration code, we are building a Pulsar producer that will use a JSON Schema from the Observation class we built for our data. The Observation class has some FasterXML Jackson annotations, but is basically a Java bean with fields for date observed, hour observed, state code, latitude and longitude, and all the fields from the REST data feed.
Producer
Let’s add our business logic and start sending events to our infinite messaging platform. The full source code is available in this Github repo.
@Service
public class PulsarService {
    @Autowired
    PulsarClient pulsarClient;

    @Autowired
    Producer producer;

    public MessageId sendObservation(Observation observation) {
        if (observation == null) {
            return null;
        }
        UUID uuidKey = UUID.randomUUID();
        MessageId msgID = null;
        try {
            msgID = producer.newMessage()
                    .key(uuidKey.toString())
                    .value(observation)
                    .send();
        } catch (PulsarClientException e) {
            e.printStackTrace();
        }
        return msgID;
    }
}

Consumer
Now that we have sent messages, we can also read them with Spring. In this section, we will build a consumer application to test ingesting the data. If we want to add logic, routing, or transformations to the events in one or more topics, we could use a Pulsar Function that we can write in Java, Python, or Go to achieve this instead of a Spring Boot microservices. I chose to do both. The source code for the Pulsar Spring Boot Consumer is in this Github repo.
An example Java Pulsar Function for processing air quality data is available in this Github repo. As you can see in our architecture diagram below, Functions, Microservices, Spark jobs and Flink jobs can all collaborate as part of real-time data pipelines with ease.
We can reuse the connection configuration that we have from the Producer, but we need a configuration to produce our Consumer. The configuration class for the Consumer will need the consumer name, subscription name and topic name from the application.properties file. In the code we set the subscription type and starting point to Shared and Earliest. We are also using the JSON Schema for Observation as used in the Pulsar Producer.
@Configuration
public class PulsarConsumerConfig {
    @Autowired
    PulsarClient pulsarClient;

    @Value("${consumer.name:consumerName}")
    String consumerName;

    @Value("${topic.name:airquality}")
    String topicName;

    @Value("${subscription.name:airqualitysubscription}")
    String subscriptionName;

    @Bean
    public Consumer getConsumer() {
        Consumer pulsarConsumer = null;
        ConsumerBuilder consumerBuilder =
        pulsarClient.newConsumer(JSONSchema.of(Observation.class))
                       .topic(topicName)
                       .subscriptionName(subscriptionName)
                       .subscriptionType(SubscriptionType.Shared)                     .subscriptionInitialPosition(SubscriptionInitialPosition.Earliest)
                       .consumerName(consumerName);
        try {
            pulsarConsumer = consumerBuilder.subscribe();
        } catch (PulsarClientException e) {
            e.printStackTrace();
        }
        return pulsarConsumer;
    }
}
As we can see it is very easy to run the consumer. After we receive the event as a plain old Java object (POJO), we can do whatever we want with the data. For example, you could use another Spring library to store to a database, send to a REST service, or store to a file.

Conclusion
We explored a number of protocols for communicating with Apache Pulsar clusters, but we did not explore all of them. We could also use RocketMQ, Websockets, or communicate via JDBC to the Pulsar SQL (Presto SQL) layer.
I also highly recommend that if you are interested in high-speed reactive applications, give the Reactive Pulsar library a try. It is a fast, impressive library that could have its own full article. Check out this talk done by Lari Hotari at ApacheCon 2021 to learn more.
The key takeaways are the rich, diverse support given to Spring applications for interacting with Apache Pulsar. Java is a first-class client for Apache Pulsar and this shows its power and flexibility by building your Pulsar applications this way. Let’s Spring into action!
Resources
- Slides The Dream Stream Team for Pulsar and Spring
- Source Code Air quality example code
- Source Code Pulsar air quality function
- Source Code Air quality consumer
- Source Code FLiPN air quality checks
- Source Code FLiPN air quality REST
- GitHub Spring Boot Starter for Apache Pulsar
- GitHub Reactive Pulsar Adapter
- Doc Pulsar Java Client
More on Pulsar
- Learn the Pulsar Fundamentals: While this blog did not cover the Pulsar fundamentals, there are great resources available to help you learn more. If you are new to Pulsar, we recommend you to take the self-paced Pulsar courses or instructor-led Pulsar training developed by the original creators of Pulsar. This will get you started with Pulsar and help accelerate your streaming.
- Spin up a Pulsar Cluster in Minutes: If you want to try building microservices without having to set up a Pulsar cluster yourself, sign up for StreamNative Cloud today. StreamNative Cloud is the simple, fast, and cost-effective way to run Pulsar in the public cloud.
- Save your spot at the Pulsar Summit San Francisco: The first in-person Pulsar Summit is taking place this August! Sign up today to join the Pulsar community and the messaging and event streaming community.
- Build microservices with Pulsar: If you are interested in learning more about microservices and Pulsar, take a look at the following resources:
- 3-Part Webinar Series Building Event-Driven Microservices with Apache Pulsar. Watch the webinars here and find the source code from the webinars here.
- Doc How to develop Pulsar Functions
- Blog Function Mesh - Simplify Complex Streaming Jobs in Cloud