Data security represents an important part for modern data infrastructure. Applying best practices for authentication and authorization ensures enterprise data is accessible only to the right tenants or components. As a messaging and streaming system powering enterprises spanning multiple industries, Apache Pulsar deals with business-critical data. It supports a wide variety of security mechanisms (for example, TLS, Athenz, Kerberos, JWT, and OAuth2.0) for organizations based on their needs.
In this blog, I will introduce available security combinations in Pulsar and then give some best practices for implementing authentication and authorization.
Understanding security mechanisms in Pulsar
By default, all encryption, authentication, and authorization configurations in Pulsar are disabled. This means any client can access the cluster, leaving your sensitive information vulnerable to external eavesdroppers. For enterprises that require strict security controls and safeguards, they can use different security strategies that Pulsar provides.
- Authentication: Validate the credentials for an entity to establish the connection.
- Authorization: Grant permissions (support ACL) to an entity to perform actions on different resources in the cluster.
- Transport encryption: Support TLS and mTLS for data security in transit.
- End-to-end encryption: Only allow producers and consumers to encrypt and decrypt data.
Now, let’s take a look at how to use different combinations of these frameworks to achieve different levels of security in Pulsar.
Level 0: Full Link Trusted
Figure 1 shows an example of Full Link Trusted. In this setting, all components within the cluster have direct access to others and no encryption mechanism is applied. For example, producers can send messages to Pulsar in plain text without any authentication. This configuration is suitable for internal tests or feature validations.
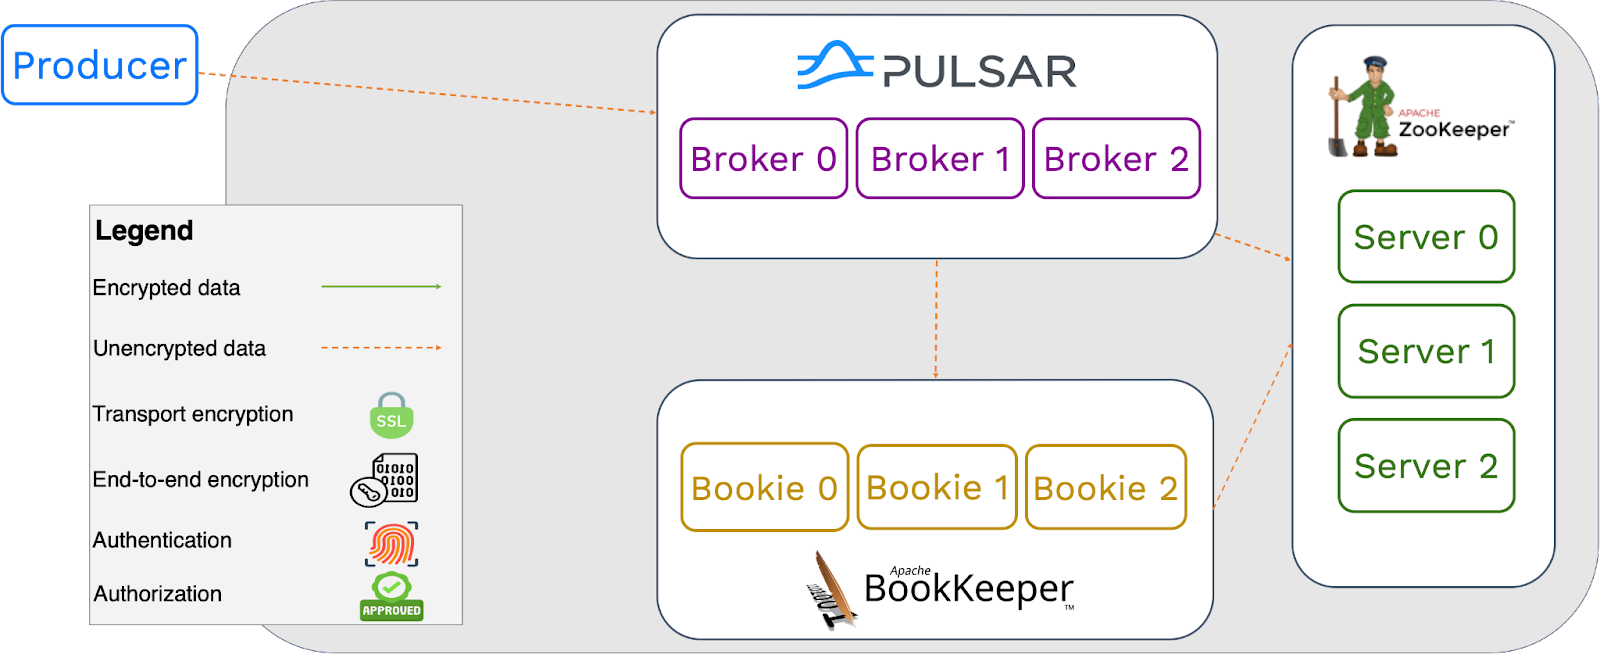 Figure 1. Full Link Trusted
Level 1: Intranet Trusted
In Intranet Trusted scenarios, the interactions between the components within the cluster are not restricted, while data transmission outside the cluster is encrypted. In these cases, you can enable TLS connections to brokers, proxies, or a load balancer.
TLS connections to brokers
Producers can send data to Pulsar brokers with SSL encryption. The decryption process may require some cluster resources and, to some extent, can impact cluster performance, which is usually acceptable. For interactions between brokers, bookies and ZooKeeper, as no authorization or authentication policy is applied, performance, latency, and throughput within the cluster are not affected.
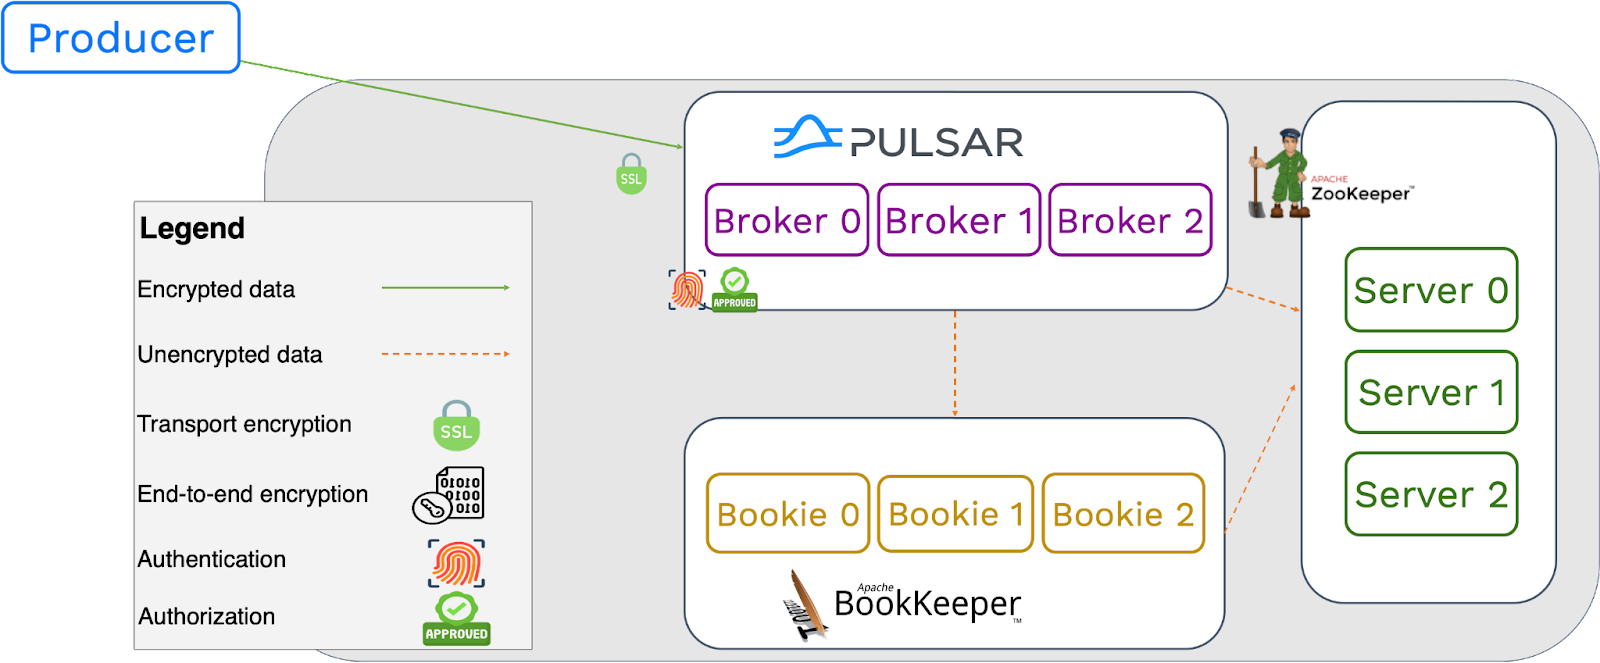 Figure 2. Intranet Trusted - TLS connections to brokers
TLS connections to proxies
Using a proxy layer for your Pulsar cluster, you can expose the address of proxy servers instead of brokers. This is especially useful when Pulsar is deployed in a private environment. In this case, you can configure authentication for data streams on the proxy layer. Communications between brokers, bookies, and ZooKeeper do not have security restrictions.
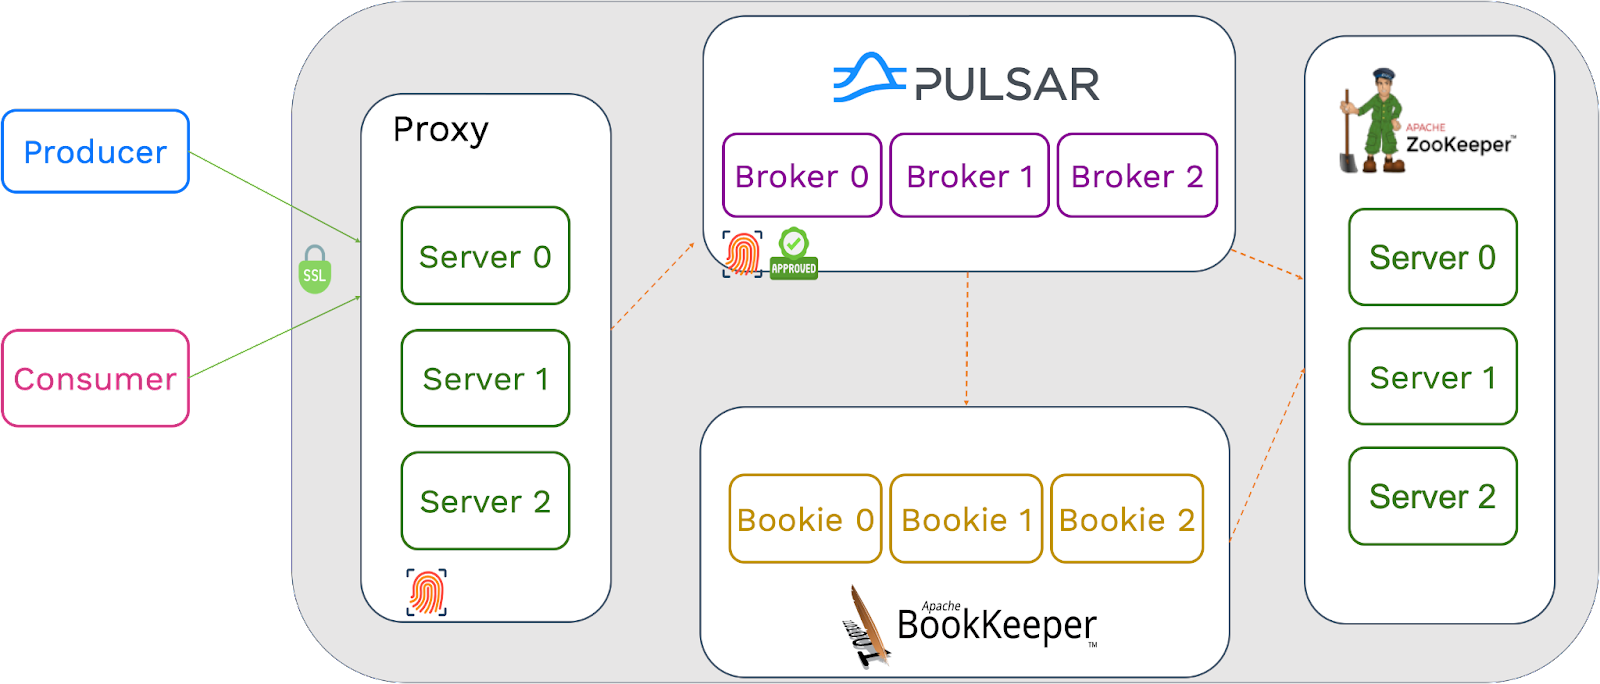 Figure 3. Intranet Trusted - TLS connections to proxies
TLS connections to a load balancer
In scenarios requiring a load balancer between clients and proxies, producers first send encrypted data to the load balancer. Then, the proxy validates the data from the load balancer and sends it to brokers, which is similar to the previous use case.
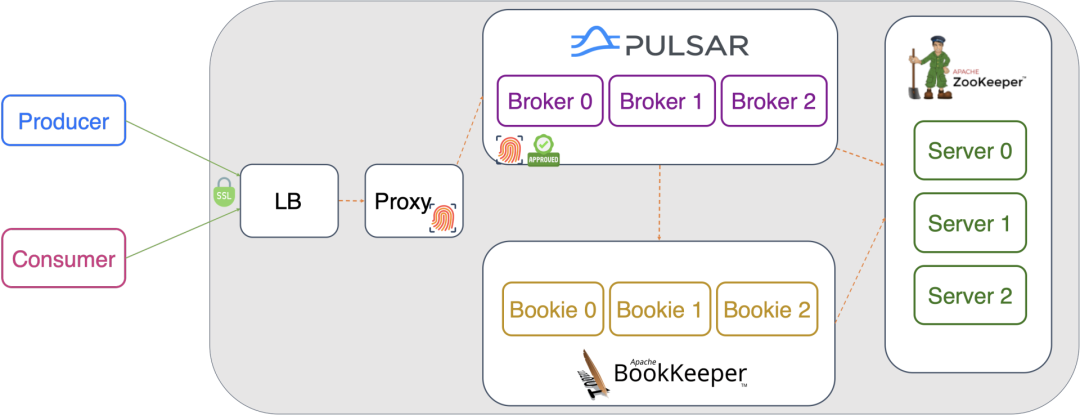 Figure 4. Intranet Trusted - TLS connections to a load balancer
Level 2: Intranet Untrusted
In some cases, external teams may need to access your cluster data, which could lead to extra security concerns. As such, I recommend enabling authentication for all components. Configuring encryption and authentication on all layers/nodes effectively avoids security issues. Additionally, you can enable authorization on the broker side to verify the permissions. This setting is commonly used for cross-departmental collaboration.
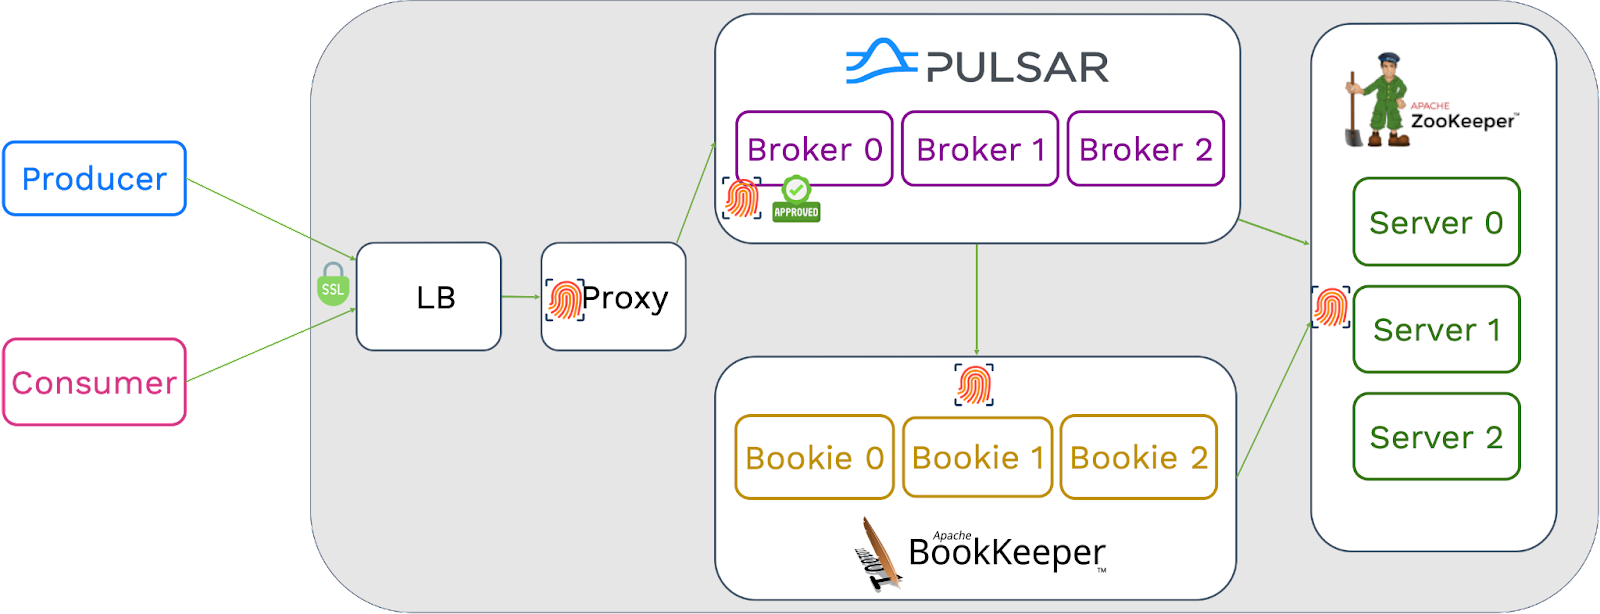 Figure 5. Intranet Untrusted
Level 3: Service Untrusted (End-to-end encryption)
Some cloud providers may offer Pulsar as a service with high security requirements. In this setting that adopts end-to-end encryption, data transmission between all components are encrypted. This full-stack security policy only allows producers and consumers to access the original data. This is different from Level 2, where data can still be decrypted on the broker side. For more information, see End-to-End Encryption in Pulsar.
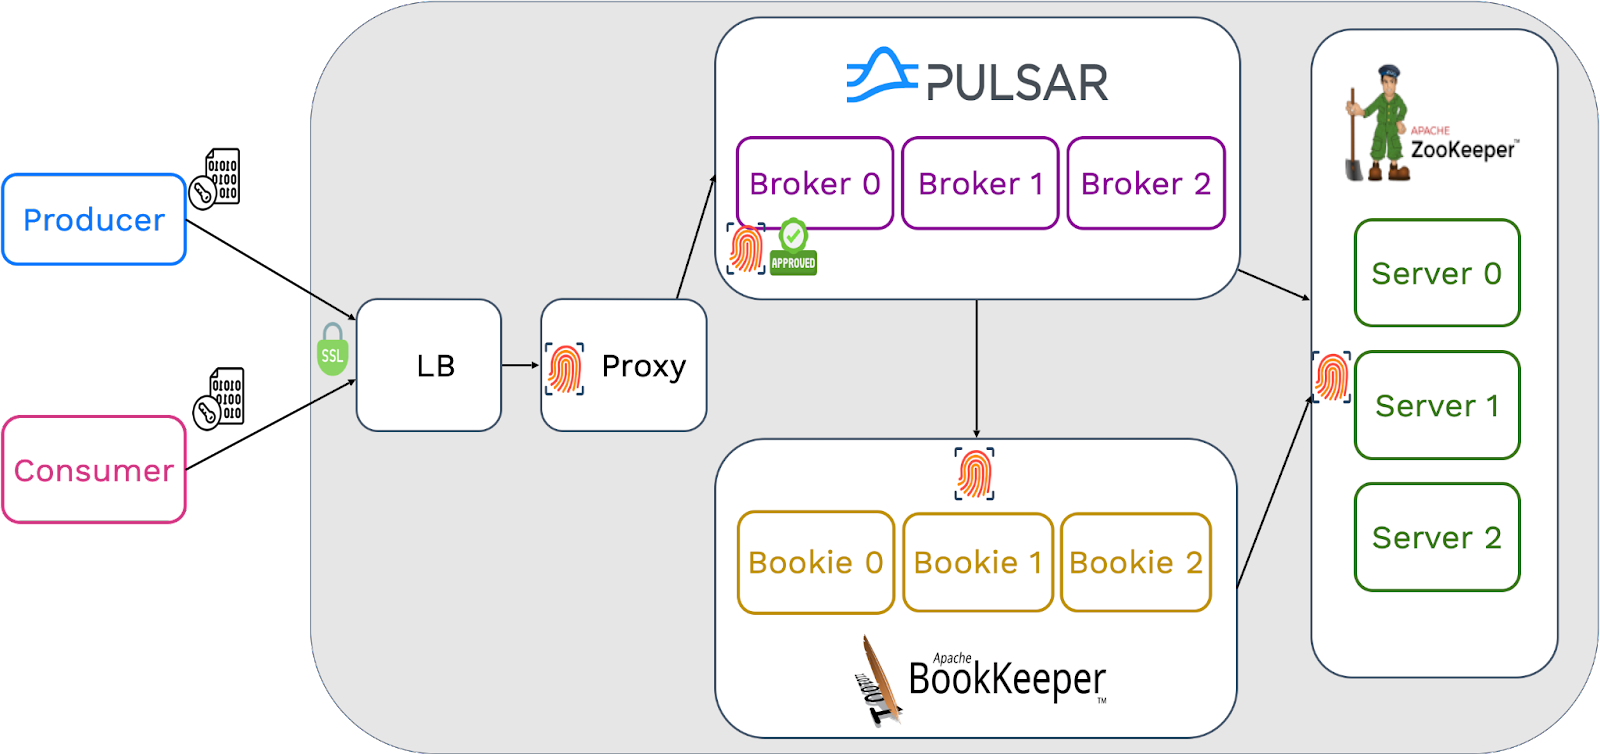 Figure 6. Service Untrusted
Extensible security framework
Pulsar has a simple and scalable security framework. Enterprises can easily customize authentication and authorization plugins.
On the server side (for example, brokers and proxies), Pulsar validates the identity of clients and records their roles. More specifically, it uses an authentication provider or a “provider chain” to establish the identity of a client and then assign a role token to that client. You can consider the role as the identifier of the client. Available authentication options are listed below:
- Built-in authentication plugins: TLS, Athenz, Kerberos, JWT, OAuth2.0, and Basic.
- Authentication provider chain: You can configure multiple authentication providers at the same time. Pulsar caches all providers locally on the server side and initializes them. For each passed authentication type from the client, Pulsar checks the corresponding provider. It considers a client as valid if it is authenticated via at least one of the configured authentication providers. For example, you can use JWT and OAuth2.0 for authenticationProviders in broker.conf with a comma separating them.
authenticationProviders=org.apache.pulsar.broker.authentication.AuthenticationProviderToken,org.apache.pulsar.broker.authentication.AuthenticationProviderBasic
Once Pulsar successfully authenticates a client through the authentication provider, it checks whether it has the permissions to perform certain operations. Pulsar offers two authorization plugins, which can be configured through authorizationProvider in broker.conf.
- AuthorizationProvider: This is the default authorization provider.
authorizationProvider=org.apache.pulsar.broker.authorization.PulsarAuthorizationProvider
- MultiRolesTokenAuthorizationProvider: If a client is identified with multiple roles in the token, Pulsar can check all of its roles. The authorization will be successful as long as one of the roles has the required permissions. This method is only applicable to JWT authentication.
authorizationProvider=org.apache.pulsar.broker.authorization.MultiRolesTokenAuthorizationProvider
Note that if you only configure authentication without authorization enabled, any authenticated client will be able to perform any action in your Pulsar cluster.
Understanding the authentication and authorization process
Now that we have learned some basics about authentication and authorization in Pulsar, let’s explore how each of them works in more depth.
Authentication
Figure 7 depicts how authentication configurations are initialized.
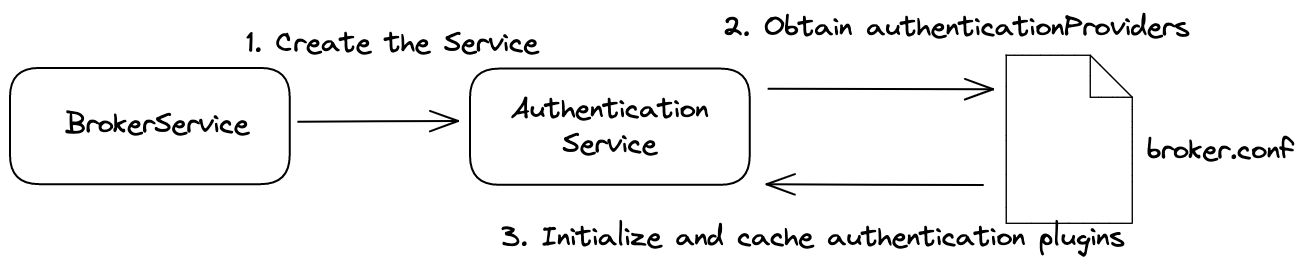 Figure 7. Initializing authentication configurations
- When the broker starts, it runs the BrokerService, which creates the AuthenticationService.
- The AuthenticationService obtains authentication providers from broker.conf.
- The AuthenticationService initializes and caches authentication plugins.
Authentication occurs when a client connects to Pulsar. The authentication process is as follows:
- The client sends a CommandConnect command to the broker, which contains related authentication information.
- The AuthenticationService obtains the authentication type (AuthMethodName) through the CommandConnect.
- The AuthenticationService calls the authenticate method to authenticate the client.
The broker caches the credentials used for authentication and periodically checks whether the credentials have expired. You can customize the interval through authenticationRefreshCheckSeconds in broker.conf, which defaults to 60 seconds.
Authorization
Figure 8 depicts how authorization configurations are initialized.
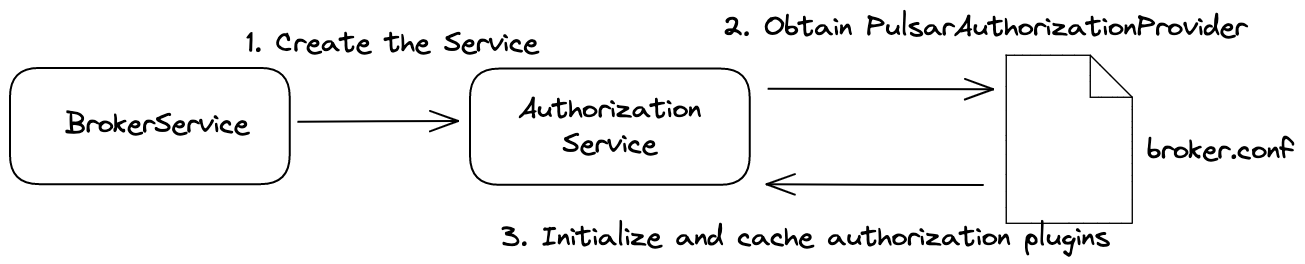 Figure 8. Initializing authorization configurations
- When the broker starts, it runs the BrokerService, which creates the AuthorizationService.
- The AuthorizationService obtains authorization providers from broker.conf.
- The AuthorizationService initializes and caches authorization plugins.
Pulsar’s authorization framework contains different roles that can perform tasks at different levels.
- Brokers: Superusers are administrators of the Pulsar cluster who have access to all resources. They create tenant administrators, who can help them manage tenant resources.
- Tenants: Tenant administrators manage tenants and grant permissions to clients.
- Namespaces: Tenant administrators set different policies for namespaces, such as retention, backlogs, functions, and resource quotas.
- Topics: Clients can produce and consume messages.
Note that only superusers and tenant administrators can grant permissions to users.
Authentication best practices
In this section, I will introduce some best practices and tips for configuring authentication using JWT and Kerberos.
JWT authentication
JSON Web Token (RFC-7519) is a common authentication method in web services, also known as JWT authentication. It identifies clients through a token string, which consists of three parts separated by dots. See an example in Figure 9.
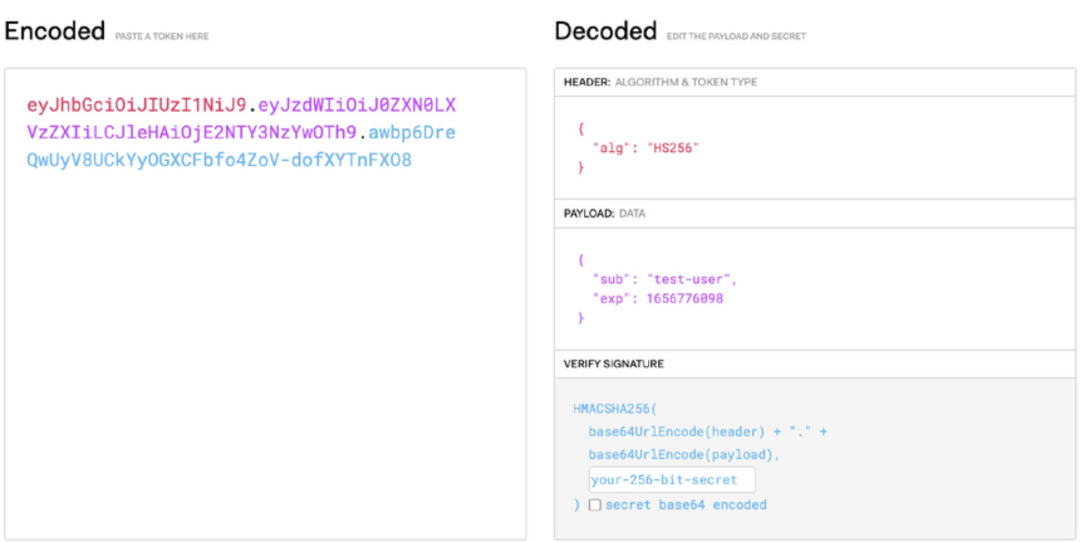 Figure 9. JWT authentication
- Header: Specifies the signature algorithm in JSON, encoded in base64url. In Pulsar, HS256 is used by default.
- Payload: Specifies the claims such as subject and expiration time in JSON, encoded in base64url.
- Signature: Specifies the algorithm to ensure the token is not changed, encoded by the header, the payload, and a secret.
Note that the header and the payload are decodable.
Here are some tips for using JWT authentication in Pulsar:
- You can use JWT for authentication and authorization but your data is still exposed. I recommend enabling TLS to encrypt data in transit especially when you have strict security requirements, though the performance may be compromised.
- JWT is independent of third-party services. Once a token is signed, you cannot revoke it during the validity period. Therefore, it is a good practice to set a short validity period for tokens of important operations.
- You can create tokens for JWT authentication using two types of keys in Pulsar: a secret key (symmetric) and a private/public key pair (asymmetric). You only need to select one of them. For more information, see Create client certificates.
- Validate your token after it is created to avoid misconfiguration. For example, you need to assign the right token if the subject needs to perform certain operations like pulsar-admin. To validate a token, use bin/pulsar tokens validate.
bin/pulsar tokens validate -pk  my-public.key -i "eyJhbGciOiJSUzI1NiJ9.eyJzdWIiOiJhZG1pbiJ9.ijp-Qw4JDn1aOQbYy4g4YGBbXYIgLA9lCVrnP-heEtPCdDq11_c-9pQdQwc6RdphvlSfoj50qwL5OtmFPysDuF2caSYzSV1kWRWN-tFzrt-04_LRN-vlgb6D06aWubVFJQBC4DyS-INrYqbXETuxpO4PI9lB6lLXo6px-SD5YJzQmcYwi2hmQedEWszlGPDYi_hDG9SeDYmnMpXTtPU3BcjaDcg9fO6PlHdbnLwq2MfByeIj-VS6EVhKUdaG4kU2EJf5uq2591JJAL5HHiuTZRSFD6YbRXuYqQriw4RtnYWSvSeVMMbcL-JzcSJblNbMmIOdiez43MPYFPTB7TMr8g"

{sub=admin}
- As mentioned above, Pulsar brokers cache the authentication information of the client and check its validity periodically (60 seconds by default). You can customize the time interval through authenticationRefreshCheckSeconds in broker.conf.
- You can configure the token through brokerClientAuthenticationParameters as a string or from a file.
# Use it as a string:
brokerClientAuthenticationParameters={"token":"eyJhbGciOiJIUzI1NiJ9.eyJzdWIiOiJ0ZXN0LXVzZXIfQ.9OHgE9ZUDeBTZs7nSMEFIuGNEX18FLR3qvy8mqxSxXw"}

# Read it from a file:
brokerClientAuthenticationParameters={"file":"///path/to/proxy-token.txt"}
- You can check the header and payload of the token using bin/pulsar tokens show.
bin/pulsar tokens show -i eyJhbGciOiJIUzI1NiJ9.eyJzdWIiOiJ0ZXN0LXVzZXIiLCJleHAiOjE2NTY3NzYwOTh9.awbp6DreQwUyV8UCkYyOGXCFbfo4ZoV-dofXYTnFXO8

{"alg":"HS256"}
---
{"sub":"test-user","exp":1656776098}
For more information, see Authentication using tokens based on JWT.
Kerberos authentication
Kerberos is a popular solution for authentication in the big data field for its simplicity and stability. Pulsar supports Kerberos authentication through the Java Authentication and Authorization Service (JAAS) for SASL configuration. The information of a user in JAAS is saved in a section. For authentication using Kerberos, the most important user information is principal and keytab, which can be easily wrapped into one section. You can store all the information in a jaas.conf file as below.
SectionName {
   com.sun.security.auth.module.Krb5LoginModule required
   useKeyTab=true
   storeKey=true
   useTicketCache=false
   keyTab="/etc/security/keytabs/pulsarbroker.keytab"
   principal="broker/localhost@EXAMPLE.COM";
};
 AnotherSectionName {
  ...
};
In the above code snippet, SectionName encapsulates the information of a Kerberos user and uses the username as the unique identifier. After you create the JAAS file, you need to do the following:
- Set the file path as a JVM parameter as below:
-Djava.security.auth.login.config=/etc/pulsar/jaas.conf
- Specify the section in broker.conf. For more information, see Configure brokers.
When using Kerberos authentication in Pulsar, the principal field can be easily misconfigured. The following is the naming convention of principal on the server side.
- It should contain three parts - service/{hostname}@{REALM}, like broker/host1@MY.REALM.
- The service field refers to the service type of each host. You can use keywords like broker and proxy for it. Other names might return a warning.
- {hostname} should be consistent with advertisedAddress. For example, if the principal of the broker service is broker/172.17.0.7@SNIO, the advertisedAddress should also be set to 172.17.0.7. I suggest you use the hostname directly to avoid IP configuration problems for multiple NICs. If you don’t want to configure DNS, you can use the IP address but make sure it is the same as advertisedAddress.
- For {REALM}, I suggest you use uppercase letters.
Note that Kerberos requires that all your hosts be resolved with their FQDNs. You can add your machines with their DNS information to /etc/hosts.
Customizing an authorization plugin using Ranger
Pulsar features a flexible authorization mechanism that allows you to easily customize your own authorization plugin. In this section, I will briefly explain how to create a custom authorization plugin using Apache Ranger for visualized permission management with some code examples. Ranger is a popular open-source project for data access governance in the big data area.
To create this plugin, you need to register Pulsar as a service in Ranger, and then implement a Pulsar authorization interface in the plugin with some methods. In the initialization method, you need to create a Ranger Client to connect to Ranger.
Additionally, you need to define Ranger resources, such as tenants, namespaces, and topics, and access types, and load them into Ranger. I will not explain related Range concepts in detail, but I provide an example here for your reference:
"resources": [
   {
           "itemId":1,
           "name":"tenant",
           "type":"string",
           "level":1,
           "parent":"",
           "mandatory":true,
           "lookupSupported":true,
           "recursiveSupported":false,
           "excludesSupported":true,
      "matcher":"org.apache.ranger.plugin.resourcematcher.RangerDefaultResourceMatcher",
           "matcherOptions":{
               "wildCard":true,
               "ignoreCase":true
           },
           "validationRegEx":"",
           "validationMessage":"",
           "uiHint":"",
           "label":"tenant",
           "description":"tenant",
   },
],
Define access types:
"accessTypes": [
   {
       "itemId": 1,
       "name": "produce",
       "label": "Produce"
   },
   {
       "itemId": 2,
       "name": "consume",
       "label": "Consume"
   },
],
The following is a code example of authorization implementation in Pulsar.
@Override
public CompletableFuture allowTopicOperationAsync(TopicName topicName,
                                                           String role,
                                                           TopicOperation operation,
                                                           AuthenticationDataSource authData) {
    if (log.isDebugEnabled()) {
        log.debug ("Check allowTopicOperationAsync [{}] on [()].", operation.name(), topicName);
    }

    return validateTenantAdminAccess(topicName.getTenant(), role, authData)
            .thenCompose(isSuperUserOrAdmin -> {
                if (log.isDebugEnabled()) {
                    log.debug("Verify if role (} is allowed to {} to topic {}: isSuperUserOrAdmin={}",
                            role, operation, topicName, isSuperUserOrAdmin);
                }
                if (isSuperUserOrAdmin) {
                    return CompletableFuture.completedFuture(true);
                } else {
                    switch (operation) {
                        case LOOKUP:
                        case GET_STATS:
                        case GET_METADATA:
                            return canLookupAsync(topicName, role, authData);
                        case PRODUCE:
                            return canProduceAsync(topicName, role, authData);
                        case GET_SUBSCRIPTIONS:
                        case CONSUME:
                        case SUBSCRIBE:
                        case UNSUBSCRIBE:
                        case SKIP:
                        case EXPIRE_MESSAGES:
                        case PEEK_MESSAGES:
                        case RESET_CURSOR:
                          case GET_BACKLOG_SIZE:
                          case SET_REPLICATED_SUBSCRIPTION_STATUS:
                          case GET_REPLICATED_SUBSCRIPTION_STATUS:
                            return canConsumeAsync(topicName, role, authData, authData.getSubscription());
                        case TERMINATE:
                        case COMPACT:
                        case OFFLOAD:
                        case UNLOAD:
                        case ADD_BUNDLE_RANGE:
                        case GET_BUNDLE_RANGE:
                        case DELETE_BUNDLE_RANGE:
                            return CompletableFuture.completedFuture(false);
                        default:
                            return FutureUtil.failedFuture(new IllegalStateException(
                                    "TopicOperation [" + operation.name() + "] is not supported.")) ;
                    }
                }
           });
}
An example of the canProduceAsync method:
@Override
public CompletableFuture canProduceAsync(TopicName topicName, String role,
        AuthenticationDataSource authenticationData) {
    CompletableFuture future = new CompletableFuture<>();

    RangerAccessResourceImpl resource = new RangerAccessResourceImpl();
    resource.setValue(KEY_TENANT, topicName.getTenant());
    resource.setValue(KEY_NAMESPACE, topicName.getNamespacePortion());
    resource.setValue(KEY_TOPIC, topicName.getLocalName().split("-partition-") [0]);
    //resource.setValue(KEY_TAG, "*");

    RangerAccessRequestImpl request = new RangerAccessRequestImpl();

    request.setAccessType(AuthAction.produce.name());
    request.setUser(role);
    request.setResource(resource);
    request.setAction(AuthAction.produce.name());

    try {
        RangerAccessResult result = rangerPlugin.isAccessAllowed(request);

        log.info("request--->{}", request);
        log.info("result--->{}", result);

        if (result.getIsAllowed()) {
            future.complete (true);
        } else {
            String errMsg = String
                    .format ("User '%s' doesn't have produce access to %s, matched policy id = %d",
                             request.getUser(), topicName.toString(), result.getPolicyId());
            log.error(errMsg);
            future.completeExceptionally(new Exception(errMsg));
        }
    } catch (Exception e) {
        // access allowed in abnormal situation
        log.error("User {} encounter exception in {} produce authorization step.",
                request.getUser(), topicName.toString(), e);
        future. complete(true);
    }
    return future;
}
Expected result in Ranger:
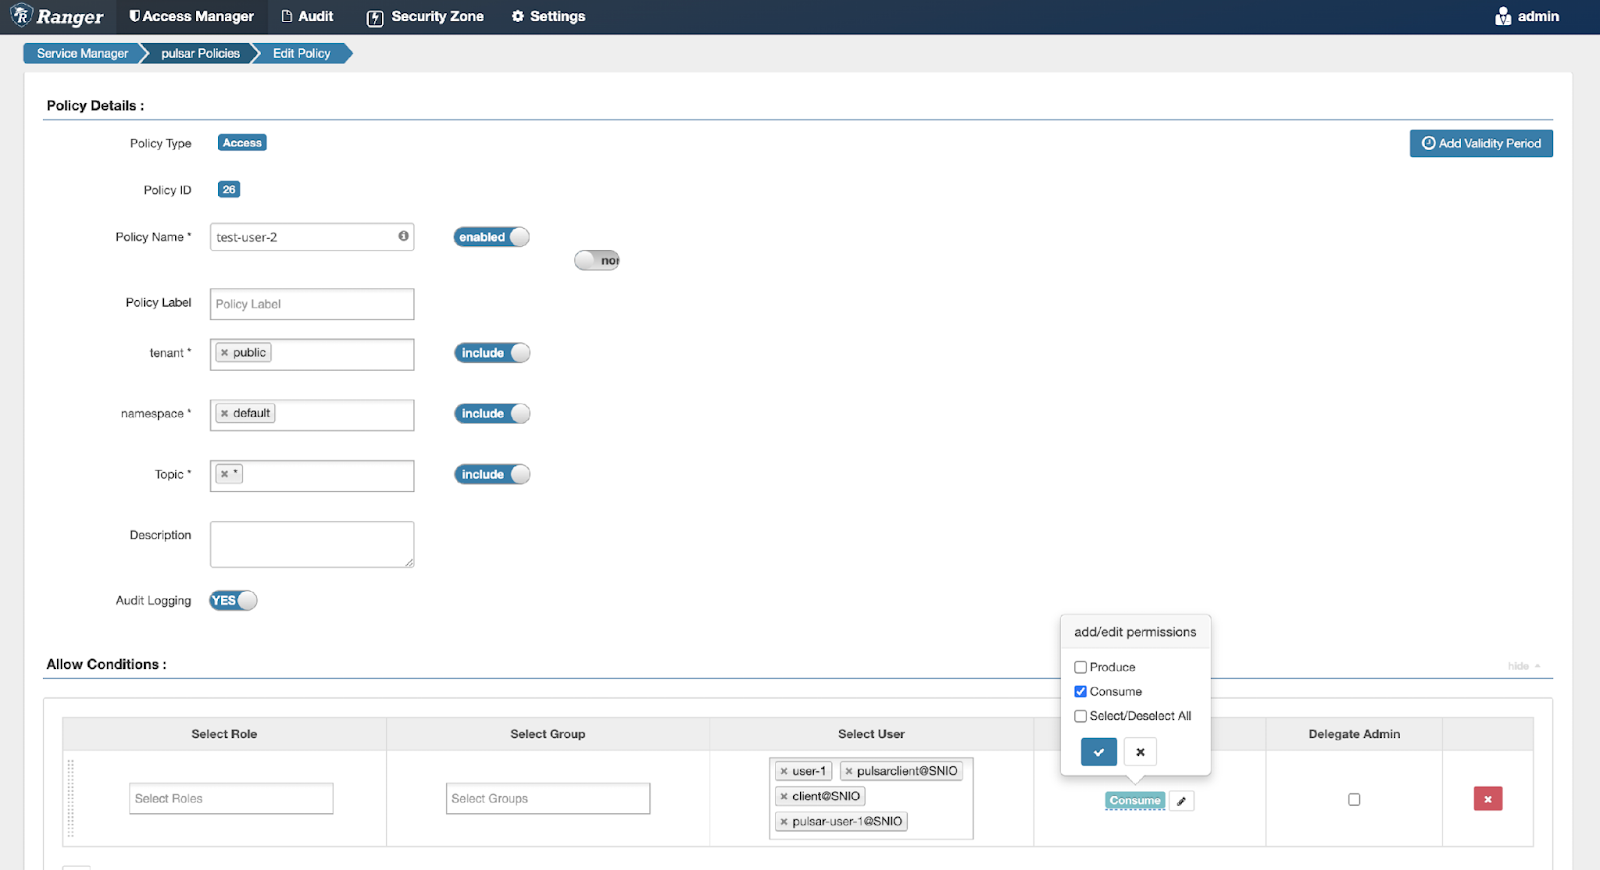 Figure 10. Visualized permission management in Ranger
Frequently asked questions about authentication and authorization in Pulsar
Q: For JWT authentication, is the local token file read in real time? Do I need to restart proxies or brokers?
A: The change of the client token file has no impact on the server side, so you don’t need to restart the servers.
Q: For JWT authentication, how do brokers cache the authentication information of the client?
A: A thread periodically checks whether the cached authentication information of the client has expired. If so, it sends the AuthChallenge command to the client. The client then sends the token file to the broker. After receiving the updated token, the broker validates the authentication and re-caches the information. If the client fails to send back valid information within the interval, the connection will be closed.
Q: For external authorization, should I configure proxies or brokers?
A: Brokers are responsible for the authorization process, so you only need to configure it on the broker side.
Conclusion
For enterprises using Pulsar, adopting a proper security policy is essential to making their data safe and secure. I can imagine new Pulsar users may easily get overwhelmed by authentication, authorization, encryption and other security concepts. I hope this blog can help those new to Pulsar understand its pluggable security mechanism and benefit from some of the best practices I mentioned.
More on Apache Pulsar
Pulsar has become one of the most active Apache projects over the past few years, with a vibrant community driving innovation and improvements to the project. Check out the following resources to learn more about Pulsar.
- Pulsar Virtual Summit Europe 2023 will take place on Tuesday, May 23rd, 2023! See this blog to submit your session or become a community sponsor (no fee required).
- Start your on-demand Pulsar training today with StreamNative Academy.
- Spin up a Pulsar cluster in minutes with StreamNative Cloud. StreamNative Cloud provides a simple, fast, and cost-effective way to run Pulsar in the public cloud.
- Doc Authentication and authorization in Pulsar
- Doc Authentication using Kerberos
- Doc Authentication using JWT
- Doc Extend authentication and authorization in Pulsar