Nov 29, 2022
12 min read

Spring into Pulsar Part 2: Spring-based Microservices for Multiple Protocols with Apache Pulsar AMQP

Tim Spann
pulsar amqp

Introduction

This is the second part of our on-going blog series Spring into Pulsar. In the first blog, I showed you how easy it is to build a Spring application that communicates with Pulsar using it’s native protocol. In this second blog, I will build the same application with other messaging protocols (MQTT, AMQP/RabbitMQ, and Kafka) that Pulsar supports to show off its flexibility. You will see how easy it is to improve the performance of your existing applications with little code change. You can see this video for details.

MQTT (MoP)

MQTT is the most commonly used messaging protocol in IoT applications. Spring has a pre-existing library for sending and receiving messages via MQTT. As a result, in many existing Spring applications you need to work with MQTT streams.

MQTT is a mature messaging protocol that is supported by Apache Pulsar via the MQTT-on-Pulsar (MoP) protocol handler. Since we have the ability to send and receive messages via MQTT and there is a pre-existing library for that in Spring, let’s use that in our Spring Boot application.

We choose to send and receive messages to topics via MQTT to show the flexibility of Pulsar and highlight integration points. In a lot of existing applications you may find yourself needing to work with MQTT streams. Now you can keep one unified messaging and streaming platform for all applications, use cases and systems.

The below code configures our application to create a client to connect to an MQTT broker, which is our Pulsar cluster in this case.

@Configuration
public class MQTTConfig {

    @Bean
    @ConfigurationProperties(prefix = "mqtt")
    public MqttConnectOptions mqttConnectOptions() {
        return new MqttConnectOptions();
    }

    @Bean
    public IMqttClient mqttClient(@Value("${mqtt.clientId}") String clientId,
                                  @Value("${mqtt.hostname}") String hostname,
                                  @Value("${mqtt.port}") int port) throws MqttException {
        IMqttClient mqttClient = new MqttClient("tcp://" + hostname + ":" + port, clientId);
        mqttClient.connect(mqttConnectOptions());
        return mqttClient;
    }
}

Next we add a Spring service to publish messages to our MQTT queue. This is easy as we utilize the topic name from our configuration file and have Spring hand us a live MQTT Client. I have a simple utility class that converts the Observation object to JSON as MQTT doesn’t have the cool Schema features of the native Pulsar client.

@Service
public class MQTTService {

    @Value("${mqtt.topic:airqualitymqtt}")
    String topicName;

    @Autowired
    private IMqttClient mqttClient;

    public void publish(final Observation payload)
            throws MqttPersistenceException, MqttException {
        MqttMessage mqttMessage = new MqttMessage();
        mqttMessage.setPayload(DataUtility.serialize(payload));
        mqttMessage.setQos(0);
        mqttMessage.setRetained(true);
        mqttClient.publish(topicName, mqttMessage);
    }
}

We have written the code to send MQTT messages, which is common for IoT applications. Since we have messages streaming into the queue, we will want to consume them. So we will also build an application in Spring to do so via the Spring MQTT library. An example of MQTT consumer code is below and shows how easy it is to do that. The below code subscribes to the MQTT queue for a specified amount of configurable time and then stops. This lets us retrieve some messages and process them without being in an infinite loop.

@Service
public class MQTTService {
    private static final Logger log = LoggerFactory.getLogger(MQTTService.class);

    @Value("${mqtt.topic:airqualitymqtt}")
    String topicName;

    @Value("${mqtt.wait.time:5000}")
    long waitMillis;

    @Autowired
    private IMqttClient mqttClient;

    public List<GenericMessage> consume() {
        List<GenericMessage> messages = new ArrayList<GenericMessage>();
        try {
            CountDownLatch countDownLatch = new CountDownLatch(10);
            mqttClient.subscribeWithResponse(topicName, (s, mqttMessage) -> {
                GenericMessage msg = new GenericMessage();
                msg.setId(mqttMessage.getId());
                msg.setPayload(new String(mqttMessage.getPayload()));
                msg.setQos(mqttMessage.getQos());
                messages.add(msg);
                countDownLatch.countDown();
            });

            try {
                countDownLatch.await(waitMillis, TimeUnit.MILLISECONDS);
            } catch (InterruptedException e) {
                e.printStackTrace();
            }
        } catch (MqttException e) {
            e.printStackTrace();
        }
        return messages;
    }
}

Our application using MQTT is now complete. Let’s try another protocol.

AMQP (AoP)

AMQP has been the go-to protocol for application messaging for almost twenty years, so it makes sense that some Spring applications will want to communicate via this protocol. Fortunately, Apache Pulsar supports AMQP via AMQP-on-Pulsar (AoP). As expected, there is an existing library that Spring can use to communicate with message brokers that use Pulsar AMQP. We will use this to send and receive messages to our Apache Pulsar cluster. When you look at the library, you will notice mention of RabbitMQ. This is the most common broker used with legacy AMQP applications.

The configuration for AMQP/RabbitMQ is very straightforward. Pass in a servername and queue (topic) and we are off.

    @Configuration
    public class AMQPConfig {
        @Value("${amqp.server:pulsar1}")
        String serverName;

        @Bean
        public CachingConnectionFactory connectionFactory() {
            CachingConnectionFactory ccf = new CachingConnectionFactory();
            ccf.setAddresses(serverName);
            return ccf;
        }

        @Bean
        public RabbitAdmin amqpAdmin() {
            return new RabbitAdmin(connectionFactory());
        }
        @Bean
        public RabbitTemplate rabbitTemplate() {
            return new RabbitTemplate(connectionFactory());
        }
        @Bean
        public Queue myQueue() {
            return new Queue("myqueue");
        }
    }

We can easily send a message via the Rabbit Template to convert and send to a topic.

    @Service
    public class AMQPService {
            @Value("${amqp.topic:amqp-airquality}")
            String topicName;

            @Autowired
            private RabbitTemplate rabbitTemplate;

            public void sendObservation(Observation observation) {
                    rabbitTemplate.convertAndSend(topicName,
                           DataUtility.serializeToJSON(observation));
            }
    }

    public static String serializeToJSON(Observation 
                                observation) {
            String jsonValue = "";
            try {
                if (observation != null) {
                    ObjectMapper mapper = new ObjectMapper();
                    jsonValue = 
            mapper.writeValueAsString(observation);
                }
            } catch (Throwable t) {
                t.printStackTrace();
            }
            return jsonValue;
        }

Since we don’t have a concept of schemas in AMQP, I use JSON serialization to send my event as a JSON payload.

Consuming messages with AMQP is super simple. You can simply set up a listener service without calling anything.

   @Service
    public class AMQPService {
        @Value("${amqp.topic:amqp-airquality}")
        String topicName;

        @Autowired
        private RabbitTemplate rabbitTemplate;

        @Component
        public class RabbitMQConsumer {
            @RabbitListener(queues = "${amqp.topic:amqp-airquality}")
            public void receiveMessage(String obs) {
                System.out.println("RabbitMQ: " + obs);
            }
        }
    }

Apache Kafka (KoP)

Apache Kafka is another popular messaging system that has been around for over a decade. Kafka has its own binary protocol for data streaming that is very commonly used in Spring and Java applications. Therefore, this is another protocol that makes sense to use in our applications.

Apache Pulsar supports the Kafka protocol via Kafka-on-Pulsar (KoP). You can give this protocol a try in StreamNative Cloud or in your own server. Once KoP is running, you can configure your application to communicate with the Pulsar server via the Kafka protocol.

For configuration, we have to set some values from the application.properties for cluster, topic name and producer name. The Kafka library requires key and value serializers to be set as that cannot happen automatically. In Spring, we set the KafkaTemplate value for a default topic to utilize later.

    @Configuration
    public class KafkaConfig {

        @Value("${producer.name:producername}")
        String producerName;

        @Value("${kafka.topic.name:airqualitykop}")
        String topicName;

        @Value("${kafka.bootstrapAddress}")
        String bootstrapAddress;

        @Bean
        public ProducerFactory<String, Observation> producerFactory()     
        {
            Map<String, Object> configProps = new HashMap<>();
            configProps.put(
                    ProducerConfig.BOOTSTRAP_SERVERS_CONFIG,
                    bootstrapAddress);
            configProps.put(
                    ProducerConfig.KEY_SERIALIZER_CLASS_CONFIG,
                    StringSerializer.class);
            configProps.put(
                    ProducerConfig.VALUE_SERIALIZER_CLASS_CONFIG,
                    JsonSerializer.class);
            return new DefaultKafkaProducerFactory<>(configProps);
        }

        @Bean
        public KafkaTemplate<String, Observation> kafkaTemplate() {
            KafkaTemplate<String, Observation> kafkaTemplate = new KafkaTemplate<String, Observation>(producerFactory());
            kafkaTemplate.setDefaultTopic(topicName);
            return kafkaTemplate;
        }
    }

Spring’s KafkaTemplate makes building Kafka applications very easy. So we could use that to build our own producers and consumers that talk to KoP. Below is a simple example of an Apache Kafka producer that uses the template with our previously used Observation model.

    @Service
    public class KafkaService {
        @Autowired
        private KafkaTemplate<String, Observation> kafkaTemplate;

        @Value("${kafka.topic.name:airqualitykafka}")
        String topicName;

        public void sendMessage(Observation message) {
            UUID uuidKey = UUID.randomUUID();
            ProducerRecord<String, Observation> producerRecord = new 
                 ProducerRecord<>(topicName,
                    uuidKey.toString(),
                    message);
            kafkaTemplate.send(producerRecord);
        }
    }

Now that you have sent messages via the Kafka protocol, you can read them with any Pulsar supported protocol. If you wish to consume these messages via Kafka, I have a Spring example here.

As you can see, this is very straightforward and another option for sending your events to Pulsar.

Conclusion

schema

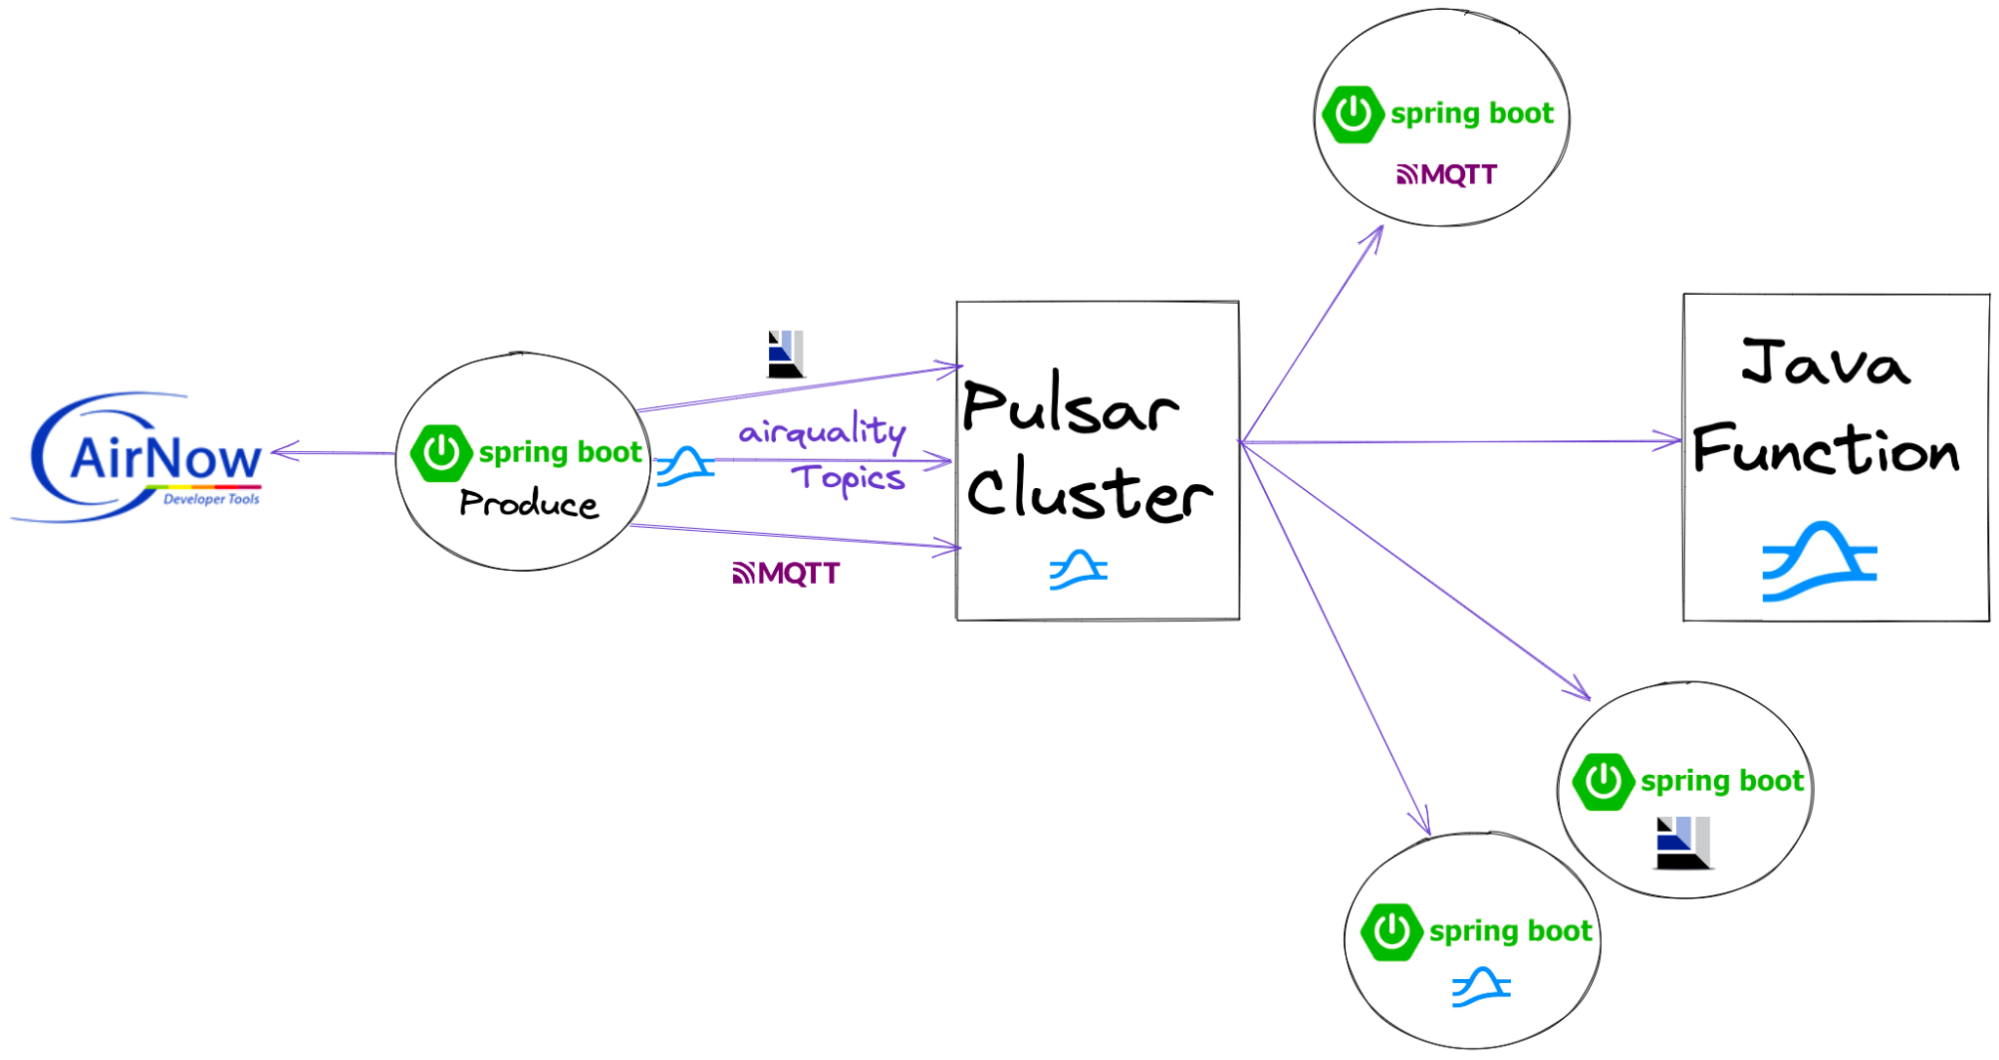
In this blog, I used other popular messaging protocols to build the same Spring application with little code change. As we can see, Spring apps for MoPs, AoPs and KoPs allow you to easily leverage legacy protocols for uplifting many applications to hybrid clouds.

Source Code

Resources

More on Apache Pulsar

  • Learn the Pulsar Fundamentals: While this blog did not cover the Pulsar fundamentals, there are great resources available to help you learn more. If you are new to Pulsar, we recommend you to take the self-paced Pulsar courses or instructor-led Pulsar training developed by some of the original creators of Pulsar. This will get you started with Pulsar and accelerate your streaming immediately.
  • Spin up a Pulsar Cluster in Minutes: If you want to try building microservices without having to set up a Pulsar cluster yourself, sign up for StreamNative Cloud today. StreamNative Cloud is a simple, fast, and cost-effective way to run Pulsar in the public cloud.
  • [3-Part Webinar Series] Building Event-Driven Microservices with Apache Pulsar. Watch the webinars here and find the source code from the webinars here.
  • [Doc] How to develop Pulsar Functions
  • [Blog] Function Mesh - Simplify Complex Streaming Jobs in Cloud
Tim Spann
Developer Advocate at StreamNative

Related articles

Apr 11, 2024
5 min read

The New CAP Theorem for Data Streaming: Understanding the Trade-offs Between Cost, Availability, and Performance

Mar 31, 2024
5 min read

Data Streaming Trends from Kafka Summit London 2024

Newsletter

Our strategies and tactics delivered right to your inbox

Thank you! Your submission has been received!
Oops! Something went wrong while submitting the form.
Pulsar Tutorials