Apache Pulsar is an open-source messaging and streaming system that provides high throughput and low latency for enterprises. To power use cases requiring strict security controls, it supports a variety of popular security frameworks, like TLS, mTLS, Athenz, Kerberos, JWT, and OAuth2.0. In this blog, I will introduce how to configure mTLS encryption and authentication in Apache Pulsar.
I will not dive deep into each security mechanism in Pulsar as this blog is focused on mTLS configuration in Pulsar. That said, I do think gaining a basic understanding of them is very important for you to choose the right security policy for your organization. If you want to know more about available security combinations in Pulsar, read the blog A Practical Guide to Enterprise-Grade Security in Apache Pulsar.
What is mTLS?
Before I talk about mTLS, let me explain TLS and how it works at a cursory level. Transport Layer Security (TLS), formerly known as SSL, is a cryptographic protocol to secure communications between two entities over a network. It guarantees data integrity and confidentiality with a public key, a private key, and a TLS certificate. Only the private key can decrypt the data encrypted by the public key. The certificate, which contains the public key, is used to verify the identity of the server.
Compared with TLS, Mutual TLS (mTLS) is a more secure protocol as it uses two-way authentication to make sure both entities are who they claim to be. As an extension of TLS, mTLS allows both the client and the server to use the certificates of each side to confirm their identities. This way, only trusted entities can have data access.
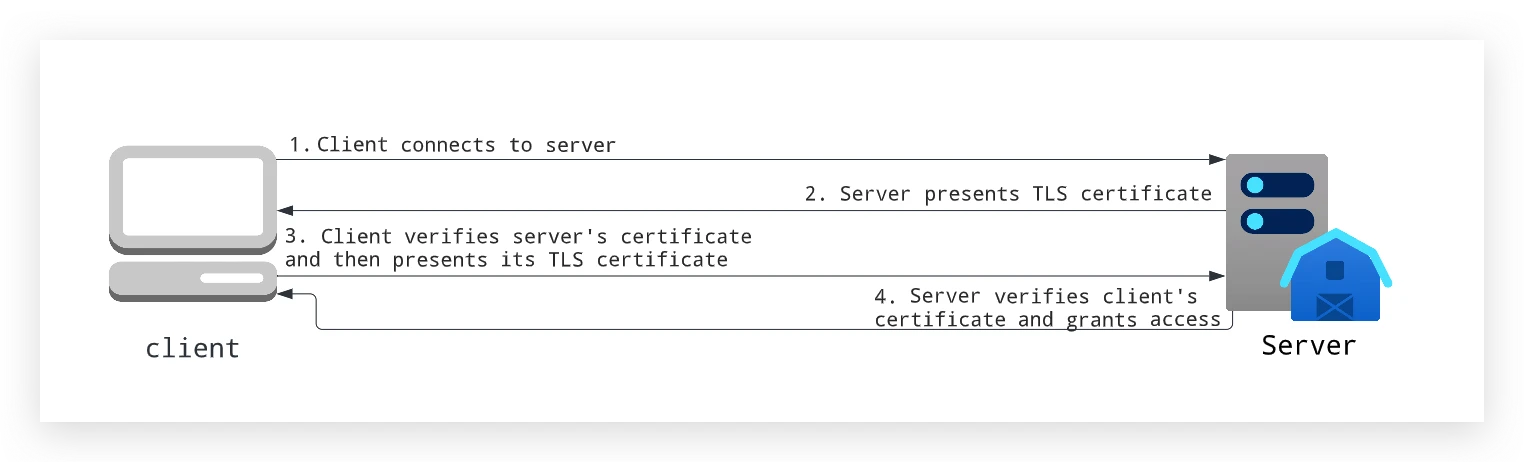 Figure 1. Mutual TLS
Why do I need mTLS in Pulsar?
Typically, mTLS is the preferred solution for configuring encryption and authentication on the cloud. As it ensures both the client and the server can verify their identities, it provides an extra layer of security.
By default, there is no security policy applied in Pulsar. Clients communicate with Pulsar in plain text. To protect sensitive information against attackers and eavesdroppers, you can use mTLS to encrypt your data streams in transit. Additionally, Pulsar provides a built-in TLS authentication plugin that can identify the client through the common name in the certificate.
Configuring mTLS in Pulsar
To use mTLS, you need some configurations both on the client and on the server. When configuring the server, you may need to set some parameters for Pulsar proxies as well depending on your deployment. Before I introduce how to configure mTLS connections, let me briefly explain why you may need the proxy layer. I believe this contributes to your understanding of how encryption and authentication work in Pulsar.
There are two typical ways to connect to Pulsar depending on how your cluster is deployed. You can either connect to Pulsar brokers directly or send requests to the proxy layer, which routes traffic to brokers. The proxy layer is optional and is commonly used in environments where external requests cannot be directly sent to brokers. For example, you can use proxy Pods to serve as the gateway if your Pulsar cluster is deployed on Kubernetes.
Now that you have a basic understanding of how clients can connect to Pulsar, let’s see how to configure mTLS for transport encryption and identity authentication respectively.
mTLS encryption
Transport encryption means that you encrypt your data before it travels across the network. As it gets decrypted on the server side, your data remains secure during transmission. To use mTLS encryption, you can set related parameters on the broker, the proxy, and the client. Note that you must create the following certificates and keys beforehand:
- CA certificate
- Server’s certificate and private key
- Client’s certificate and private key
For more information on certificates and keys, see the Pulsar documentation. When you have them ready, refer to the configurations below for each component.
Broker configurations
Add the following configurations to broker.conf to enable mTLS.
# TLS ports
brokerServicePortTls=6651
webServicePortTls=8081

# CA certificate
tlsTrustCertsFilePath=/path/to/ca.cert.pem
# Server certificate
tlsCertificateFilePath=/path/to/broker.cert.pem
# Private key for the server
tlsKeyFilePath=/path/to/broker.key-pk8.pem

# Enable mTLS
tlsRequireTrustedClientCertOnConnect=true

# Configure TLS for the internal client to connect to the broker
brokerClientTlsEnabled=true
brokerClientTrustCertsFilePath=/path/to/ca.cert.pem
brokerClientCertificateFilePath=/path/to/client.cert.pem
brokerClientKeyFilePath=/path/to/client.key-pk8.pem
Proxy configurations
Add the following configurations to proxy.conf to enable mTLS.
# TLS ports
servicePortTls=6651
webServicePortTls=8081

# CA certificate
tlsTrustCertsFilePath=/path/to/ca.cert.pem
# Server certificate
tlsCertificateFilePath=/path/to/proxy.cert.pem
# Private key for the server
tlsKeyFilePath=/path/to/proxy.key-pk8.pem

# Enable mTLS
tlsRequireTrustedClientCertOnConnect=true

# Configure TLS for the internal client to connect to the broker
tlsEnabledWithBroker=true
brokerClientTrustCertsFilePath=/path/to/ca.cert.pem
brokerClientCertificateFilePath=/path/to/client.cert.pem
brokerClientKeyFilePath=/path/to/client.key-pk8.pem
CLI tools
Add the following configurations to client.conf to enable mTLS.
webServiceUrl=https://localhost:8081/
brokerServiceUrl=pulsar+ssl://localhost:6651/
authPlugin=org.apache.pulsar.client.impl.auth.AuthenticationTls
authParams=tlsCertFile:/path/to/client.cert.pem,tlsKeyFile:/path/to/client.key-pk8.pem
Client code examples (Java)
PulsarAdmin admin = PulsarAdmin.builder().serviceHttpUrl("https://localhost:8081")
       .tlsTrustCertsFilePath("/path/to/ca.cert.pem")
       .tlsKeyFilePath("/path/to/client.key-pk8.pem")
       .tlsCertificateFilePath("/path/to/client.cert.pem")
       .build();

PulsarClient client = PulsarClient.builder().serviceUrl("pulsar+ssl://localhost:6651")
       .tlsTrustCertsFilePath("/path/to/ca.cert.pem")
       .tlsKeyFilePath("/path/to/client.key-pk8.pem")
       .tlsCertificateFilePath("/path/to/client.cert.pem")
       .build();
mTLS authentication
Authentication refers to the process of verifying the identity of requesters using their credentials. To use mTLS authentication, you can set related parameters on the broker, the proxy, and the client. Note that you must create the following certificates and keys beforehand:
- CA certificate
- Server’s certificate and private key
- Client’s certificate and private key
When you have them ready, refer to the configurations below for each component.
Broker configurations
Add the following configurations to broker.conf to enable mTLS.
# TLS ports
brokerServicePortTls=6651
webServicePortTls=8081

# CA certificate
tlsTrustCertsFilePath=/path/to/ca.cert.pem
# Server certificate
tlsCertificateFilePath=/path/to/broker.cert.pem
# Private key for the server
tlsKeyFilePath=/path/to/broker.key-pk8.pem

# Enable mTLS
tlsRequireTrustedClientCertOnConnect=true

# Enable authentication
authenticationEnabled=true
# Set the TLS authentication plugin
authenticationProviders=org.apache.pulsar.broker.authentication.AuthenticationProviderTls

# Configure TLS for the internal client to connect to the broker
brokerClientTlsEnabled=true
brokerClientTrustCertsFilePath=/path/to/ca.cert.pem
brokerClientAuthenticationPlugin=org.apache.pulsar.client.impl.auth.AuthenticationTls
brokerClientAuthenticationParameters={"tlsCertFile":"/path/to/client.cert.pem","tlsKeyFile":"/path/to/client.key-pk8.pem"}
Proxy configurations
Add the following configurations to proxy.conf to enable mTLS.
# TLS ports
servicePortTls=6651
webServicePortTls=8081

# CA certificate
tlsTrustCertsFilePath=/path/to/ca.cert.pem
# Server certificate
tlsCertificateFilePath=/path/to/proxy.cert.pem
# Private key for the server
tlsKeyFilePath=/path/to/proxy.key-pk8.pem

# Enable mTLS
tlsRequireTrustedClientCertOnConnect=true

# Enable authentication
authenticationEnabled=true
# Set the TLS authentication plugin
authenticationProviders=org.apache.pulsar.broker.authentication.AuthenticationProviderTls

# Configure TLS for the internal client to connect to the broker
tlsEnabledWithBroker=true
brokerClientTrustCertsFilePath=/path/to/ca.cert.pem
brokerClientAuthenticationPlugin=org.apache.pulsar.client.impl.auth.AuthenticationTls
brokerClientAuthenticationParameters={"tlsCertFile":"/path/to/client.cert.pem","tlsKeyFile":"/path/to/client.key-pk8.pem"}
CLI tools
Add the following configurations to client.conf to use mTLS.
authPlugin=org.apache.pulsar.client.impl.auth.AuthenticationTls
authParams=tlsCertFile:/path/to/client.cert.pem,tlsKeyFile:/path/to/client.key-pk8.pem
Client code examples (Java)
Authentication tlsAuth = new AuthenticationTls("/path/to/client.cert.pem", "/path/to/client.key-pk8.pem");

PulsarAdmin admin = PulsarAdmin.builder().serviceHttpUrl("pulsar+ssl://localhost:6651")
       .tlsTrustCertsFilePath("/path/to/ca.cert.pem")
       .authentication(tlsAuth)
       .build();

PulsarClient client = PulsarClient.builder().serviceUrl("https://localhost:8081")
       .tlsTrustCertsFilePath("/path/to/ca.cert.pem")
       .authentication(tlsAuth)
       .build();
Conclusion
mTLS is an ideal solution for securing service-to-service communications for modern applications. That said, the authentication process itself requires some CPU resources, which means your cluster performance can be impacted. In the ever-changing cybersecurity field, I believe there is no one-size-fits-all solution and we need to have a flexible security policy based on the actual needs. This also means we need to make some trade-offs under certain circumstances. For example, in a “Zero Trust” environment, I suggest you enable mTLS for all connections so that every component on the network needs authentication to gain data access. When the connection between the proxy and the broker is trusted, you can only configure mTLS on the proxy layer for better CPU utilization.
More on Apache Pulsar
Pulsar has become one of the most active Apache projects over the past few years, with a vibrant community driving innovation and improvements to the project. Check out the following resources to learn more about Pulsar.
- Pulsar Virtual Summit Europe 2023 will take place on Tuesday, May 23rd, 2023! See this blog to submit your session or become a community sponsor (no fee required).
- Start your on-demand Pulsar training today with StreamNative Academy.
- Spin up a Pulsar cluster in minutes with StreamNative Cloud. StreamNative Cloud provides a simple, fast, and cost-effective way to run Pulsar in the public cloud.
- Blog A Practical Guide to Enterprise-Grade Security in Apache Pulsar
- Doc Configure mTLS encryption with PEM
- Doc Authentication using mTLS