Introduction to Spring with Pulsar
In the first article I discussed a way to use Spring with Apache Pulsar via the standard Java framework. In this blog, I will show you how to build a simple Spring Pulsar application utilizing the new official Spring Pulsar library.
The Spring-Pulsar library is currently available in this GitHub repo. You can watch a talk on this library at The Golden Path to Spring One. The slides are available here.
Building an Air Quality Application with Spring and Pulsar
Below is a diagram of my example application that I will build. As you can see, Apache Pulsar is the lynchpin of this design. It acts as a router, gateway, messaging bus, and data distribution channel.
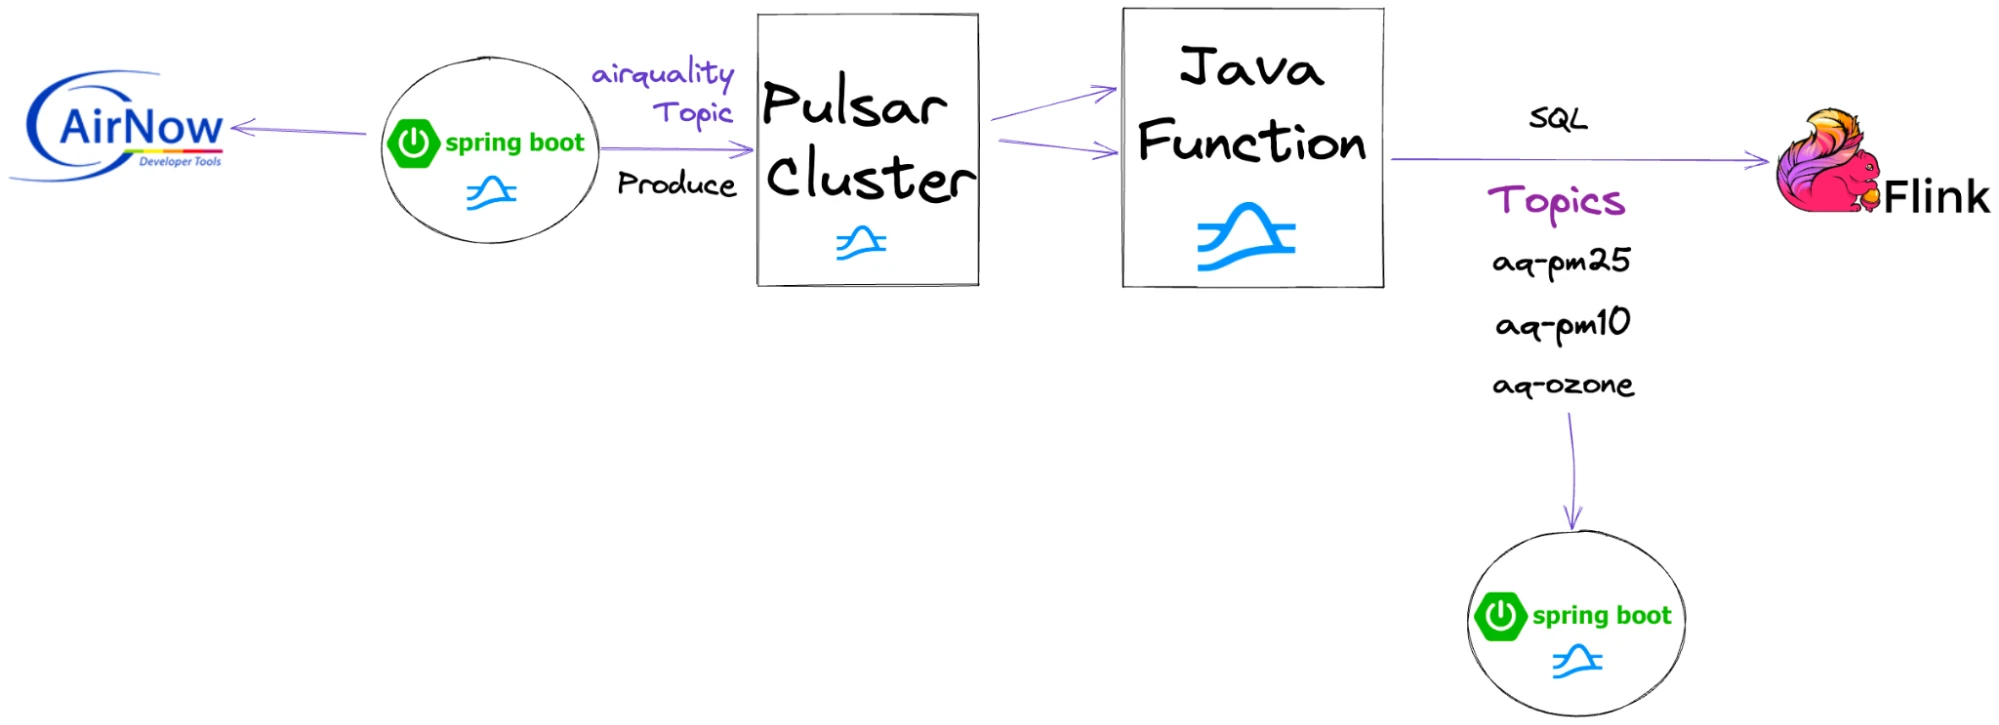 Figure 1. Building an air quality application with Spring and Pulsar
First, we set the version of Pulsar to build against. For this example, I chose Pulsar 2.10.1. I am also using JDK 17. You can build a new Spring Boot Maven project with start.spring.io and choose Maven & Java 17. Add these properties in the properties section of your POM file:
Figure 1. Building an air quality application with Spring and Pulsar
First, we set the version of Pulsar to build against. For this example, I chose Pulsar 2.10.1. I am also using JDK 17. You can build a new Spring Boot Maven project with start.spring.io and choose Maven & Java 17. Add these properties in the properties section of your POM file:
    17
    2.10.1
Next, let’s add the Pulsar client dependencies.
    org.springframework.pulsar
    spring-pulsar-spring-boot-starter
    0.1.0
Now we can compile with the following:
mvn clean package
To run the application, type:
mvn spring-boot:run
We need to populate our configuration file (application.yml) with the necessary values to connect to our cluster and ingest data. This file is typically in src/main/resources.
spring:
    pulsar:
      client:
#        service-url: pulsar+ssl://sn-academy.sndevadvocate.snio.cloud:6651
#        auth-plugin-class-name: org.apache.pulsar.client.impl.auth.oauth2.AuthenticationOAuth2
#        authentication:
#          issuer-url: https://auth.streamnative.cloud/
#          private-key: file:///sndevadvocate-tspann.json
#          audience: urn:sn:pulsar:sndevadvocate:my-instance
        service-url: pulsar://localhost:6650
      producer:
        send-timeout-ms: 20000
        producer-name: airqualityspringbootm1
        topic-name: persistent://public/default/airquality
airnowapi:
  base-url: https://www.airnowapi.org
  airquality-uri: /aq/observation/zipCode/current/?format=application/json&distance=250&zipCode={zipCode}&API_KEY={apiKey}
  api-key: ${API_KEY:}
  zip-codes:
    - 78701
    - 08520
    - 94027
The security.mode and pulsar.service.url are commented out. This allows me to switch between my unsecured development environment and my production StreamNative hosted cloud version. We could automate this or use environment variables to make this more production quality. The airnowapi.url variable is set by the environment and includes a custom token to access Air Now REST feeds. You will need to sign up and get your own if you wish to use this data stream.
We can now start building our application. First, we will need to configure our connection to our Pulsar cluster.
We can now configure a template to use in our service.
@Autowired
private PulsarTemplate pulsarTemplate;
this.pulsarTemplate.setSchema(Schema.JSON(Observation.class));
In the above configuration code, we are building a Pulsar producer that will use a JSON Schema from the Observation class we built for our data. The Observation class has some FasterXML Jackson annotations, but is basically a Java bean with fields for date observed, hour observed, state code, latitude and longitude, and all the fields from the REST data feed.
Producer
Let’s add our business logic and start sending events to our infinite messaging platform. The full source code is available in this GitHub repo.
List observations = airQualityService.fetchCurrentObservation();
MessageId msgid = pulsarTemplate.newMessage(observation)
    .withMessageCustomizer((mb) -> mb.key(uuidKey.toString()))
    .send();
Consumer
Now that we have sent messages, we can also read them with Spring. In this section, we will build a consumer application to test ingesting the data. If we want to add logic, routing, or transformations to the events in one or more topics, we could use a Pulsar Function that we can write in Java, Python, or Go to achieve this instead of Spring Boot microservices. I chose to do both.
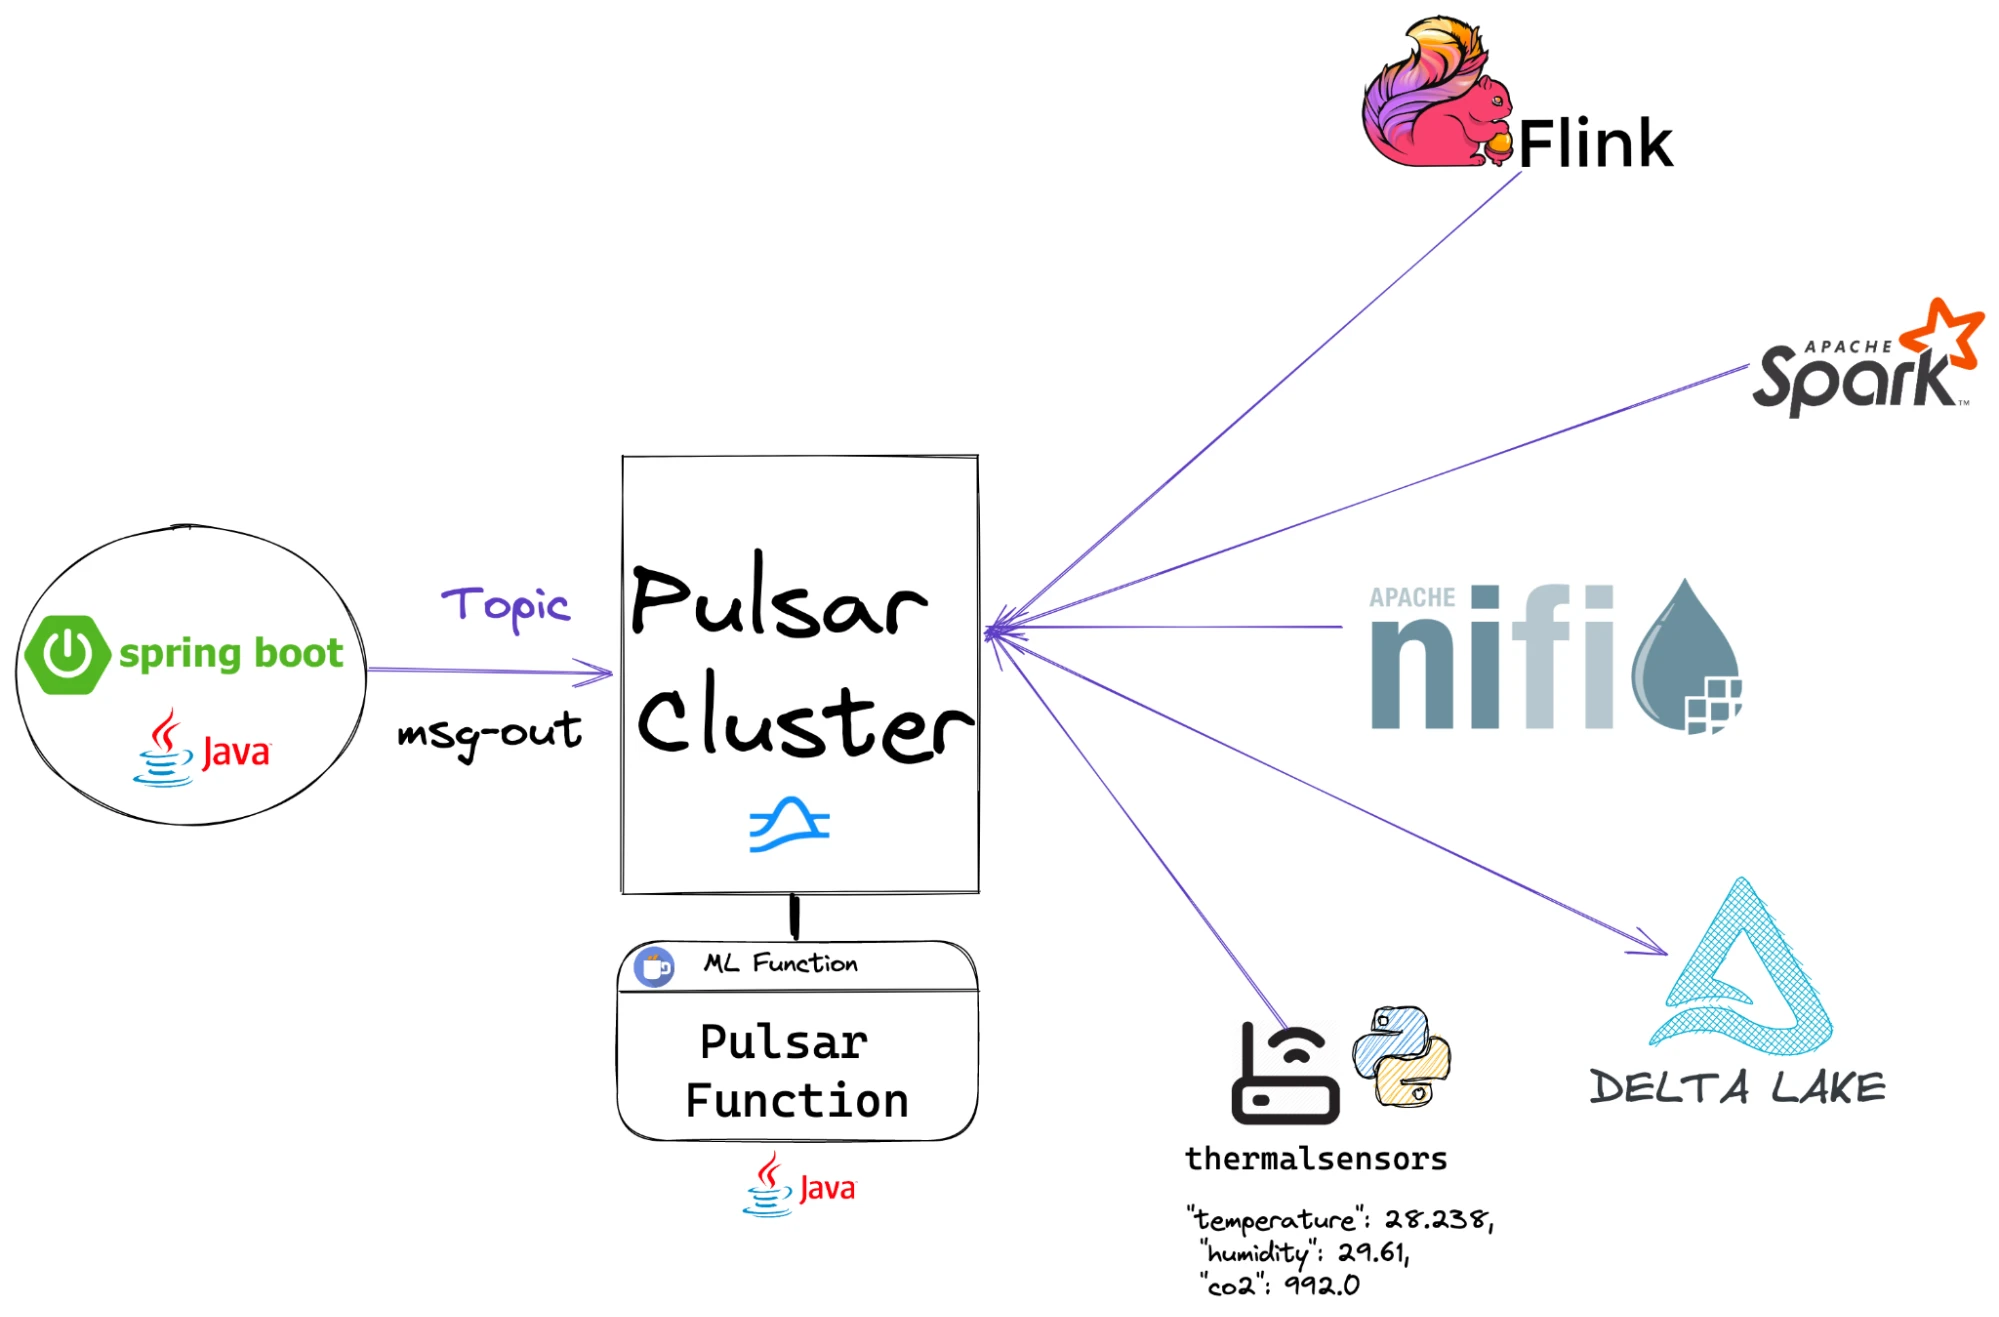 Figure 2. Real-time data pipeline
An example Java Pulsar Function for processing air quality data is available in this GitHub repo. As you can see in the architecture diagram, Functions, microservices, Spark jobs and Flink jobs can all collaborate as part of real-time data pipelines with ease.
Figure 2. Real-time data pipeline
An example Java Pulsar Function for processing air quality data is available in this GitHub repo. As you can see in the architecture diagram, Functions, microservices, Spark jobs and Flink jobs can all collaborate as part of real-time data pipelines with ease.
We can reuse the connection configuration that we have from the Producer, but we need a configuration to produce our Consumer. The configuration class for the Consumer will need the consumer name, subscription name and topic name from the application.properties file. In the code we set the subscription type and starting point to Shared. We are also using the JSON Schema for Observation as used in the Pulsar Producer.
@PulsarListener(subscriptionName = "pm25-spring-reader", subscriptionType = Shared, schemaType = SchemaType.JSON, topics = "persistent://public/default/aq-pm25")
    public void echoObservation(Observation message) {
        this.log.info("PM2.5 Message received: {}", message);
    }
As we can see, it is very easy to run the consumer. After we receive the event as a plain old Java object (POJO), we can do whatever we want with the data. For example, you could use another Spring library to store to a database, send to a REST service, or store to a file.
You can also use other protocols or tools for the application. See the following examples for details.
- MQTT to MoP
- AMQP to AoP
- Kafka to KoP
- Timeplus
- ScyllaDB
- Apache NiFi
- Websockets / JQuery / HTML
- Function to Process Data
Conclusion
The key takeaways are the rich, diverse support given to Spring applications for interacting with Apache Pulsar. Java is a first-class client for Apache Pulsar and this shows its power and flexibility by building your Pulsar applications this way. Let’s Spring into action!
Resources
- Source Code Air quality example code
- Source Code Pulsar air quality function
- Source Code Air quality consumer
- Source Code FLiPN air quality checks
- Source Code FLiPN air quality REST
- GitHub Repo Spring Boot Starter for Apache Pulsar
- GitHub Repo Reactive Pulsar Adapter
- Doc Pulsar Java Client
More on Apache Pulsar
- Learn Pulsar fundamentals. While this blog did not cover Pulsar fundamentals, there are great resources available to help you learn more. If you are new to Pulsar, you can take the self-paced Pulsar courses or instructor-led Pulsar training developed by the original creators of Pulsar. This will get you started with Pulsar and help accelerate your streaming.
- Spin up a Pulsar cluster in minutes. If you want to try building microservices without having to set up a Pulsar cluster yourself, sign up for StreamNative Cloud today. StreamNative Cloud provides a simple, fast, and cost-effective way to run Pulsar in the public cloud.
- Submit your session at Pulsar Virtual Summit Europe 2023. Pulsar Virtual Summit Europe 2023 will take place on Tuesday, May 23rd, 2023! See this blog to submit your session or become a community sponsor (no fee required).
- Build microservices with Pulsar. If you are interested in learning more about microservices and Pulsar, take a look at the following resources:
- ~3-Part Webinar Series Building Event-Driven Microservices with Apache Pulsar. Watch the webinars here.
- ~Blog Spring into Pulsar
- ~Blog Announcing Spring for Apache Pulsar
- ~Blog Spring into Pulsar Part 2: Spring-based Microservices for Multiple Protocols with Apache Pulsar